
This article has been machine-translated from Chinese. The translation may contain inaccuracies or awkward phrasing. If in doubt, please refer to the original Chinese version.
Key Content of This Lesson
- Understanding front-end “engineering” concepts, tools, and goals
- Every team needs a few people who are familiar with Webpack — to some extent, it can become a core competency
- An essential path for senior front-end developers
Course objectives:
- Understand Webpack’s basic usage
- Build a knowledge system through introductions to Webpack features, Loader and Plugin component design
- Won’t cover every detail of Webpack
- Won’t dive deep into source code to explain underlying implementation principles
What Is Webpack
What makes up a front-end project? — Resources
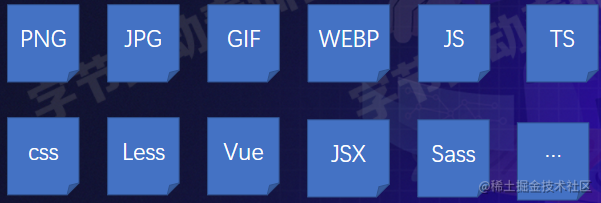
In the old days, these resources were managed manually, which had several major drawbacks that significantly impacted development efficiency:
- Dependent on manual work — for example, with 50 JS files… the process is tedious
- When code files have dependencies, you must write them in strict dependency order
- Development and production environments are identical, making it hard to adopt TS or new JS features
- It’s hard to integrate tools like Less and Sass
- JS, image, and CSS resource management models are inconsistent
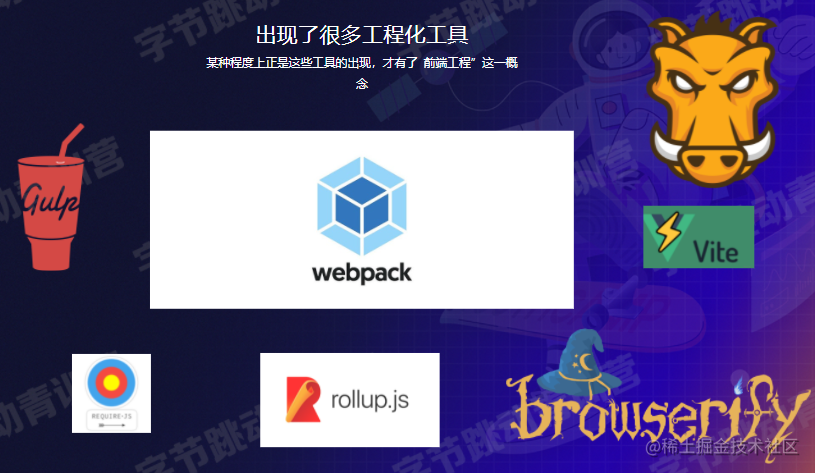
Later, many front-end engineering tools emerged, especially Webpack
Webpack is essentially a front-end resource compilation and bundling tool
- Bundle multiple resource files into a single Bundle
- Supports
- Babel, ESLint, TS, CoffeeScript, Less, Sass
- Supports modular processing of CSS, images, and other resource files
- Supports HMR + development server
- Supports continuous watching and continuous building
- Supports code splitting
- Supports Tree-shaking
- Supports Sourcemap
- …
Webpack Bundling Core Flow
Example
-
Installation (make sure to open the command line with administrator privileges)
npm i -D webpack webpack-cli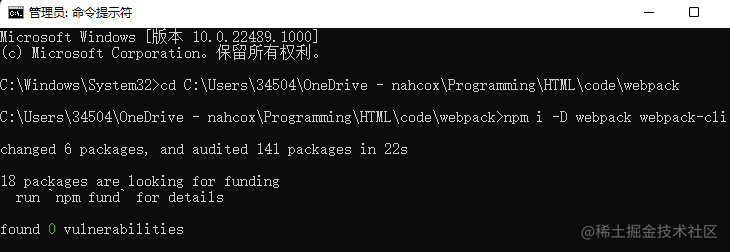
-
Edit the configuration file webpack.config.js
module.exports = { entry: 'main.js', // Define the entry file for the current project output: { // Define the output file for the current project filename: "[name].js", path: path.join(__dirname, "./dist"), }, module: {// Define loader-related content, as shown below rules: [{ test: /\.less$/i, use: ['style-loader', 'css-loader', 'less-loader'] }] } } -
Execute the compilation command
npx webpack
Steps
Entry => Dependencies Lookup => Transform => Bundle => Output
Extremely simplified version:
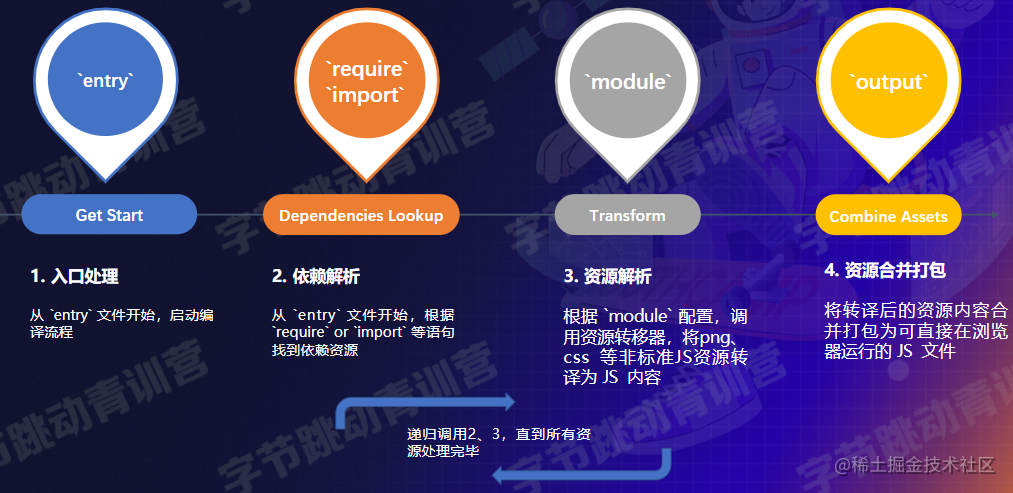
- Start compilation from the entry file specified in entry
- Dependency resolution: Find dependent resources based on
requireorimportstatements - According to the
moduleconfiguration, invoke resource transformers to compile non-JS resources into JS content until all resources are processed - Merge and bundle: Combine the transpiled resource content into JS files that can run directly in the browser
Modularity + Consistency
- Merge multiple resource files into one, reducing the number of HTTP requests
- Support modular development
- Support advanced JS features
- Support TypeScript, CoffeeScript, and other dialects
- Unify the processing model for images, CSS, fonts, and other resources
- Etc…
Key Configuration Items (How to Use?)
Regarding Webpack usage, it basically revolves around configuration, which can be roughly divided into two categories:
- Flow-type: Affects one or several stages of the flow, directly impacting bundling results
- Tool-type: Outside the main flow, providing additional engineering capabilities
PS: The official documentation is indeed… hard to understand.
Configuration overview:
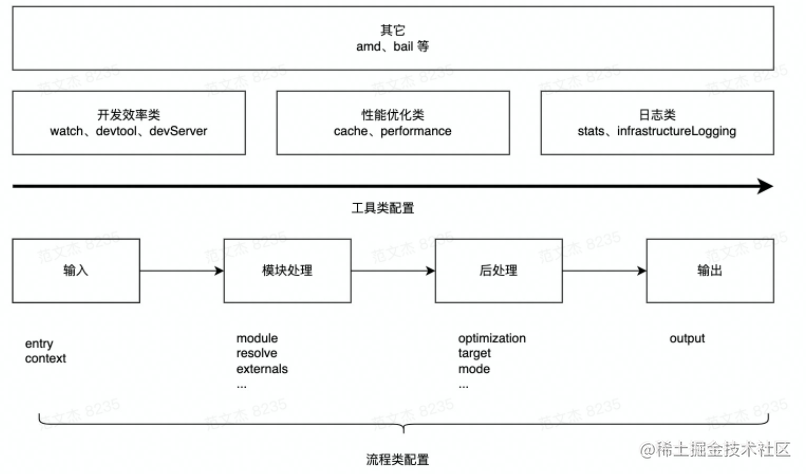
By usage frequency, the main configuration items are:
-
entry/output — program input and output, required
-
module/plugins
-
As shown, if a project needs to load less files, the following loaders need to be imported
-
-
mode
-
watch/devServer/devtool
Webpack Configuration Official Documentation
Using Webpack to Process CSS/Less etc
-
Install Loaders
npm add -D css- Loader style-loader -
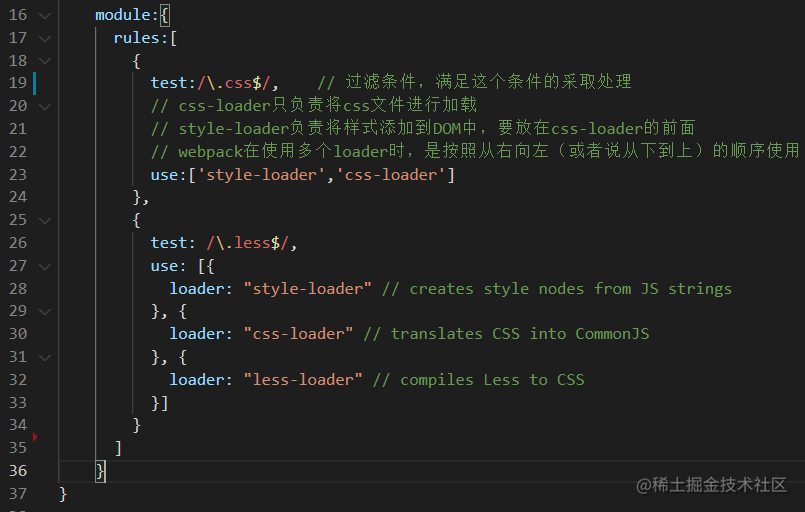
Add module to handle CSS files
Discussion Questions
- What role does a Loader play? Why do we need css-loader and style-loader here?
- Compared to maintaining CSS in HTML files the old way, what are the advantages and disadvantages of this approach?
- Have you used CSS preprocessor frameworks like Less, Sass, or Stylus? How do you integrate these tools with Webpack?
- Answer: I’ve used Less
References:
Using Webpack to Integrate Babel
-
Install dependencies
npm -D @babel/core @babel/preset-env babel-loader -
Declare entry
entry& outputoutput -
Add module to handle JS files
module: { rules: [ { test: /\.js?$/, use: [ { loader: 'babel-loader', options: { presets: [['@babel/preset-env']], }, }, ], }, ]; } -
Execute
npx webpack
Discussion Questions
- What exactly does Babel do?
- What problems do Babel and Webpack each solve? Why can they work together?
References:
Using Webpack to Generate HTML
-
Install dependencies
npm i -D html-webpack-plugin -
Configuration
plain` const path = require( "path"); const HtmlWebpackPlugin = require('html-webpack-plugin'); module.exports = { entry: "./src/index", output: { filename:" [name]. js", path: path.join(__dirname, "./dist"), }, plugins: [new HtmlWebpackPlugin()] };plain`
- Execute
npx webpack
Discussion Questions
- Compared to manually maintaining HTML content, what are the advantages and disadvantages of this auto-generation approach?
References:
Using Webpack — HMR
Hot Module Replacement — module hot replacement (your code updates are immediately reflected in the browser~)
-
Enable HMR
module.exports={ // ... devServer: { hot:true; // Required } }; -
Start webpack
For the underlying principles, refer to: Webpack Principles Series 10: Complete HMR Principle Analysis (qq.com)
Using Webpack — Tree-Shaking
Tree-Shaking — used to remove Dead Code
Dead Code
- Code that is not used, unreachable
- Code whose execution result is not used
- Code that is only read, never written
Tree-Shaking
- Modules that are exported but not used by other modules
How to enable it?
- mode: “production”
- optimization:
  module.exports = {
   entry: "./src/ index",
   mode: "production",
   devtool: false,
   optimization: {
    usedExports: true,
   },
  };
PS: Has a remarkable effect on utility libraries like Lodash, significantly reducing bundle size
Other Tools
- Caching
- Sourcemap (mentioned in previous lessons)
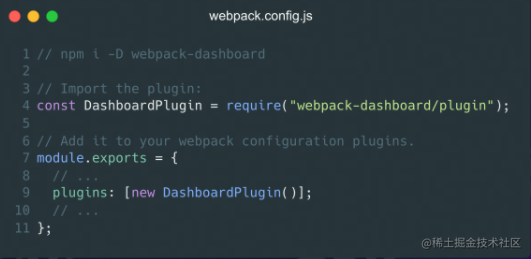
- Performance monitoring
- Logging
- Code minification
- Code splitting
- …
Discussion Questions
- Besides the items mentioned above, what other configurations can be classified as “flow-type” configurations?
- What specific roles do tool-type configurations play? Including devtool/cache/stats, etc.
Understanding Loaders
The core function of a Loader: Convert non-JS resources into JS resources
-
Install Loaders
npm add -D css-loader style-loader less-loader -
Add module to handle less files
module.exports = {
module: {
rules: [
{
test: /\.less$/i,
use:[
"style-loader",
"css-loader",
"less-loader",
],
},
],
},
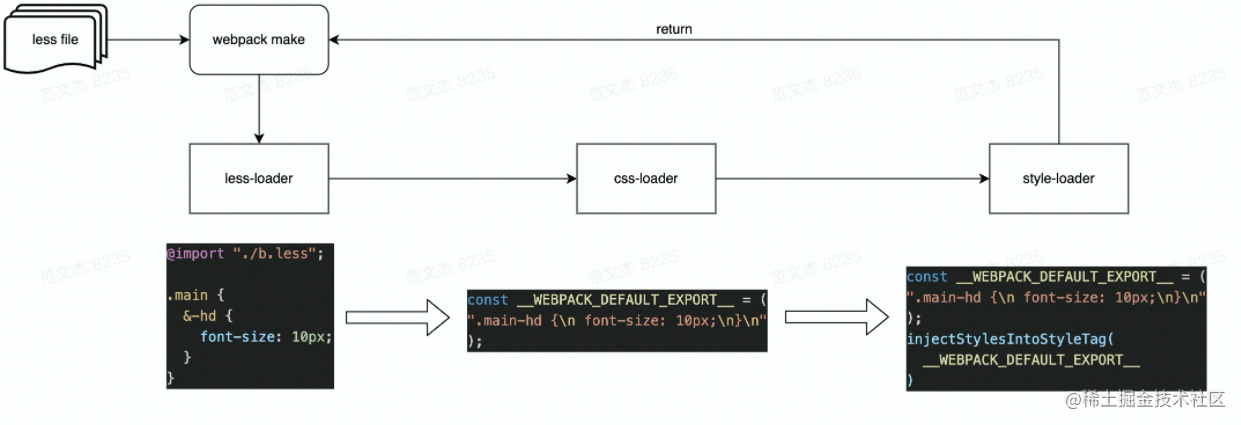
};Understanding Loaders: Chain Calling
- less-loader: Implements less => css transformation
- css-loader: Implements css => js transformation, wrapping CSS into content like module.exports = ”${css}”. The wrapped content conforms to JavaScript syntax
- style-loader: Wraps the css module into a require statement, and at runtime calls functions like injectStyle to inject content into the page’s style tag
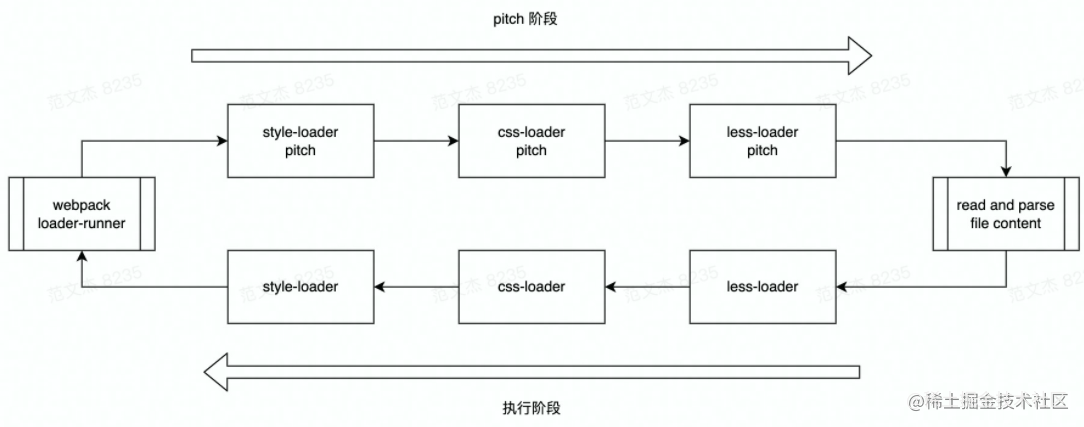
Understanding Loaders: Other Features
Characteristics
- Chain execution
- Support for asynchronous execution
- Divided into normal and pitch modes
- Reference: Webpack Principles Series 7: How to Write a Loader (qq.com)
module.exports = function(source, sourceMap?, data?) {
// source is the loader's input
// It may be file content or the result from the previous loader
return source;
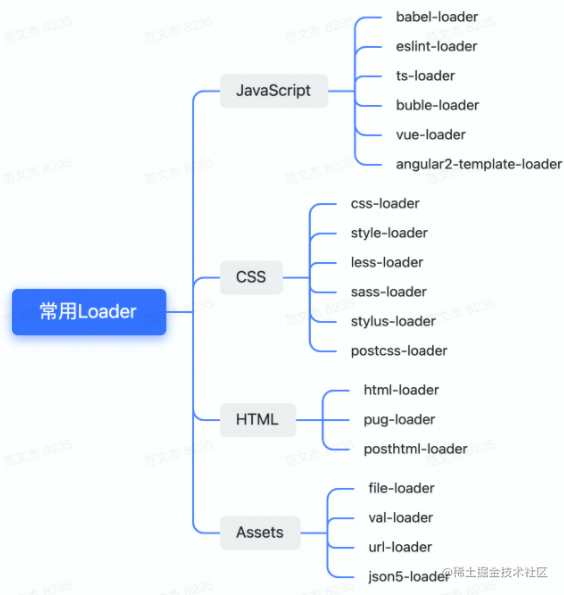
};Common Loaders
- From a usage perspective, it’s recommended to understand the functionality and configuration methods of these common Loaders
Discussion Questions
- What is the input to a Loader? What is the required output?
- What does chain calling of Loaders mean? How do you chain multiple Loaders together?
- How do you handle asynchronous scenarios in a Loader? How do you throw an exception?
Understanding Plugins
What Are Plugins
- Many well-known tools, such as:
- VS Code, WebStorm, Chrome, Firefox
- Babel, Webpack, Rollup, ESLint
- Vue, Redux, Quill, Axios
- And so on, all designed with a so-called “plugin” architecture. Why?
Plugins can enhance the extensibility of the entire application
If an application has no plugins and the whole thing is an extremely complex process, then:
- New team members need to understand the entire process details, resulting in high onboarding costs
- Feature iteration costs are high — changing one thing affects everything
- Rigid features — as an open-source project, it lacks growth potential
High cognitive cost => Low maintainability => Weak viability The essence of plugin architecture: Open for extension, closed for modification — essentially the Open/Closed Principle

In fact, many of Webpack’s own features are also implemented through plugins
How to Write Plugins
First: Plugins revolve around hooks
class SomePlugin {
  apply(compile) {
    compiler.hooks.thisCompilation.tap('SomePlugin', (compilation) => {});
  }
}
Hooks
-
Timing: At specific nodes in the compilation process, Webpack notifies plugins about what is happening through hooks;
-
Context: Through the callback mechanism provided by tapable, context information is passed as parameters;
-
Interaction: The context parameter object contains many interfaces with side effects that plugins can use to make changes
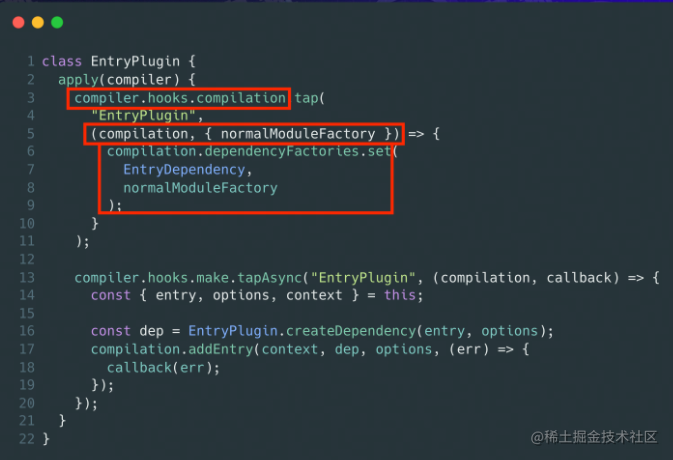
Timing: compiler.hooks.compilation
Parameters: compilation, etc.
Interaction: dependencyFactories.set
Discussion Questions
- What are the similarities and differences between Loaders and Plugins?
- What role do “hooks” play? How do you listen to hook functions?
References:
How to Learn Webpack
Beginner Level: Learn to Apply Flexibly
- Understand the bundling flow
- Master common configuration items, Loaders, and Plugins, and be able to flexibly set up Webpack environments that integrate Vue, React, Babel, ESLint, Less, Sass, image processing, and other tools
- Master common scaffolding tools, such as: Vue-cli, create-react-app, @angular/cli
Intermediate: Learn to Extend Webpack
- Understand the Loader and Plugin mechanisms, and be able to develop Webpack components independently
- Understand common performance optimization techniques and be able to apply them to real problems
- Understand front-end engineering concepts and the current ecosystem
Master: Source-Code-Level Understanding of Webpack Bundling and Compilation Principles
- Read the source code, understand Webpack’s compilation and bundling principles, and even contribute to the project
Summary
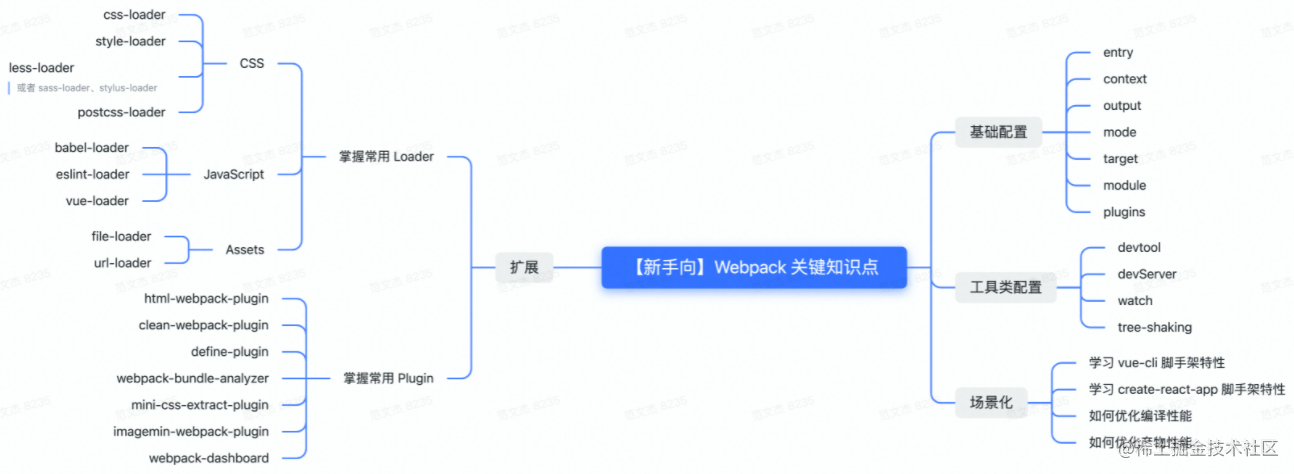
This lesson covered Webpack’s role, configuration structure and key configuration items in detail, as well as chain calling in Loaders, the implementation principles of plugins, and other features. The instructor’s deep research on Webpack was evident, as he debugged directly into loader internals during the class to help us understand. The instructor also summarized the Webpack knowledge system: Webpack 5 Knowledge System - GitMind.
Q&A
Q: To what level should you master Webpack for interviews?
A: Most online interview questions revolve around three main topics:
- What role do Loaders play? How do you write a Loader? What are common Loaders?
- Common loaders: css-loader, style-loader, vue-loader, file-loader, eslint-loader, babel-loader, etc.
- What are Plugins for? How do you write a Plugin? What about compilation principles?
- What do Bundle, chunk, and module each mean?
Some resources: Webpack In Depth
Most of the content cited in this article comes from Teacher Fan Wenjie’s course. Feel free to follow the instructor’s WeChat official account: Tecvan
喜欢的话,留下你的评论吧~