This article has been machine-translated from Chinese. The translation may contain inaccuracies or awkward phrasing. If in doubt, please refer to the original Chinese version.
Game Development in Frontend Scenarios
Development Roles and Pipeline
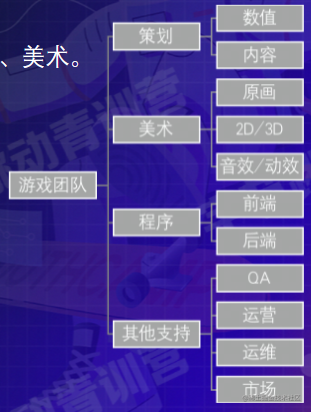
Team division in game development:
Building the smallest but most complete game development team requires only 3 people: planner, programmer, and artist.
Of course, if you’re skilled enough, you can work as an independent developer.
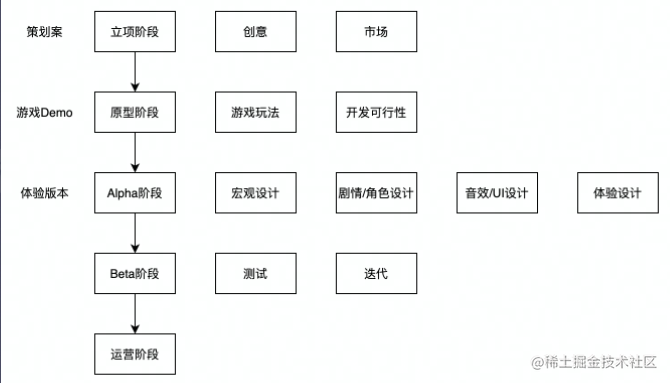
Basic Pipeline
Project initiation -> Prototype phase -> Alpha version -> Beta phase -> Operations phase
Why Use a Game Engine
The biggest advantage of game engines: rendering
Engines were born because a company made a game, and when making the next game, they reused code from the previous one. Later they found that this code was used in almost every game, so extracting it became an engine.
Can you do complex animation rendering and interaction without an engine? Of course you can. Is it convenient? Not necessarily.
So a game engine is more like a complete solution that improves your development efficiency when making a certain type of product.
Want multi-platform porting? React Native, Weex, Cordova and other solutions can do that too.
Want physics effects? MatterJS, ammo.js and other physics engines are available.
Want animations? CSS can do that. More complex? Encapsulate an animation library.
So why use a game engine?
- Provides a complete implementation solution without needing to piece together and encapsulate things yourself
- Spend less time to achieve better results, especially regarding rendering efficiency and performance optimization
- Provides common functionality needed during game development
- Engines provide many components that can shorten development time and make game development simpler
- Professional engines typically perform better than custom-built ones
Game engines typically include renderers, 2D/3D graphic elements, collision detection, physics engines, sound, controller support, animation, and other components.
Transitioning from Frontend to Game Development
First, a clear understanding: Frontend development and game development are not mutually exclusive.
Many H5 games and mini games on the market today are made by web frontend developers, not dedicated game development teams or professional game developers. The reasons may include:
- The number of developers in frontend development far exceeds those in game development (high recruitment costs)
- The barrier to entry for 2D game engines is already low enough (easy to get started)
- The implementation of game mechanics in campaign H5s is somewhat ambiguous (blurred development boundaries)
- Many mainstream 2D game engines now support development using JavaScript along with related engineering capabilities, which is also a sign of game development converging with web frontend development.
Therefore, from a web frontend developer’s perspective, 2D game engines are nothing more than a framework, a solution.
However, there are differences in development philosophy: Traditional game development focuses more on content.
Game Engines
Common Game Engines on the Market
Let’s set aside some desktop game engines for now, such as:
- Unreal (Unreal Engine, notable titles: “PUBG”, “GTA5”)
- Source (Source Engine, notable titles: “CS”, “Dota2”)
- Frostbite Engine (notable titles: “Battlefield”, “Need for Speed 18”)
- Unity3D (notable titles: “Hearthstone”, “Honor of Kings”)
One step at a time - let’s first look at the engines that are easiest for frontend developers to pick up.
Type-Specific Client Game Engines
The NVL Maker
THE NVL Maker - Visual Novel Maker
NoCode development - you only need to write text scripts with some configuration to generate a visual novel game.
Notable titles: “Fate/stay night” and many GAL Games on Steam.
Of course, due to lack of iteration and operations, this game engine is relatively niche. There’s also a frontend library called AVG.js Project (with PixiJS as the rendering engine).

RPG Maker
RPG Maker allows Low Code building of level-based games, suitable for developers who lack coding skills but want to express their creativity.
- “To The Moon”, a Steam bestseller created with the RPGMaker series engine
Web Game Engines
Graphics rendering libraries abstracted using Canvas and WebGL as underlying technologies (often with additional features).
Common capabilities of Web game engines:
- Preloading
- Games have massive static assets including scenes, elements, sounds, animations, models, textures, etc. Using native JS for requests while coordinating request timing and loading would be extremely cumbersome.
- The preloading engine abstracts loading timing and process, solving efficiency issues in loading code.
- Display, Layer, and Composition Systems
- For Web game programming, Canvas or WebGL is typically chosen as the rendering method (think about why DOM isn’t used as the rendering method).
- Canvas and WebGL as low-level APIs have very basic interfaces, requiring extensive coding for simple displays. Also, there’s no composition or layering between graphics, making it difficult to handle element composition and layer issues.
- Rendering engines and layer/composition systems emerged to solve this.
- Animation Systems: Animations are typically divided into tween animations and frame-by-frame animations. Here we discuss tween animation systems.
- Tween animation systems in native JS require consideration alongside frame rendering, resulting in massive code volume and cognitive load with low abstraction. Hence the need for game engine animation systems.
- Sound and Audio Systems:
- Games require more three-dimensional, immediate feedback compared to regular web frontends, and sound effects are an important part of feedback.
- Sound and audio systems typically integrate playback, volume, stop, pause, and other functionalities.
Cocos
Advantages
- Good platform support
- Complete game feature support
- Good ecosystem
Disadvantages
- 3D capabilities still under development
- Version iterations too frequent

Laya
Advantages
- Relatively mature 3D capabilities, claims 90% market share
- Supports JS, TS, AS
- Small engine size
Disadvantages
- Unfriendly UI
- Poor ecosystem

Egret
Advantages
- Relatively complete toolchain
- Good third-party library support
- Strong enterprise customization
Disadvantages
- Update iteration bottleneck
- Poor ecosystem
You can see that the interfaces of these game engines are quite similar.
CreateJS & Phaser
These two game engines don’t have visual interfaces.
Using CreateJS as an example:
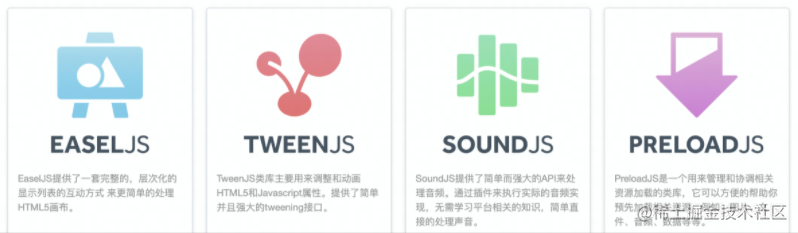
It’s a collection of multiple libraries:
-
EASELJS (controls asset display and composition), TWEENJS (controls tween animations), SOUNDJS (controls sound), PRELOADJS (controls loading). The game is composed of assets displayed, animated, and sounded after preloading. Phaser game engine, beyond CreateJS’s basic display, sound, animation, and loading systems,
-
also includes cameras, physics engine, built-in browser, plugin system, and other advanced features.
Functional Engines
Large game engines are often assembled from smaller functional engines. A large game engine typically combines rendering engines, physics engines, UI systems, sound systems, animation systems, particle systems, skeletal systems, network systems, and more. The most important are the rendering engine and physics engine. Functional engines focus on specific capabilities, characterized by small size and complete functionality. PixiJS and Three.js in particular are often mistaken for complete game engines, but they are rendering engines focused on rendering capabilities.
Here are some functional engines you might frequently encounter:
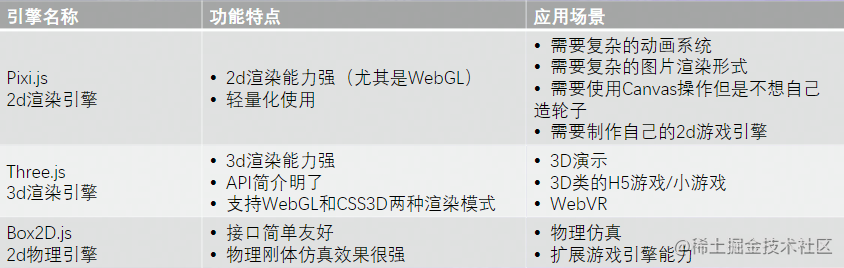
- Pixi.js
- Strong 2D rendering capabilities (especially WebGL)
- Complex animation systems, complex image rendering, building your own 2D game engine, etc.
- Three.js
- Strong 3D rendering capabilities
- Suitable for 3D effect demos or 3D H5 games/mini games
- Box2D.js
- 2D physics engine
- Object simulation capabilities
2D Game Engine Technical Architecture
Using Cocos engine’s architecture as an example:
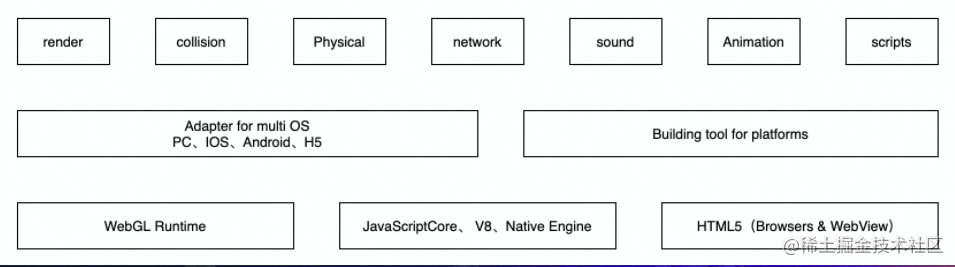
-
render (renderer), collision, Physical
-
Adapters for PC, iOS, Android, H5… and build tools for each platform
-
Runtime
Web Game Engine Rendering Principles
Using Pixi’s rendering pipeline as an example:
The general process is:
-
Create a Renderer, get its view (a canvas object), and add it to the DOM Tree (or specify an existing canvas object in the DOM Tree as the view).
-
In the MainLoop, call Renderer.render() and pass in a DisplayObject as the root node to begin rendering.
-
Starting from the scene tree’s root node, perform depth-first traversal ordered by zIndex from small to large, rendering each node, drawing the entire scene from back to front (CanvasRenderer).
-
WebGL render method execution process (educational)
render(displayObject, renderTexture, clear, transform, skipUpdateTransform) { // 1. Apply transform (GPU level) this.projection.transform = transform; // 2. Render texture binding and BatchRendering handling this.renderTexture.bind(renderTexture); this.batch.currentRenderer.start(); // 3. Execute element rendering, add vertices, indices, and textures to BatchRendering display0bject.render(); // 4. Execute renderer's draw method this.batch.currentRenderer.flush(); // Handle textures based on clear and renderTexture parameters... // 5. Clear transform this.projection.transform = null; } -
Canvas render method execution process
Using Pixi’s rendering pipeline as an example:
render(displayobject, renderTexture, clear, transform, skipUpdateTransform) {
    const context = this.context;
    // 1. Push current state onto state stack
    context.save();
    // 2. Initialize transform and style properties
    context.setTransform(1, 0, 0, 1, 0, 0);
    context.globaLAlpha = 1;
    this._activeBlendMode = BLEND_MODES.NORMAL;
    this._outerBlend = false;
    context.globalCompositeOperation = this.blendModes[BLEND_MODES.NORMAL];
    // 3. Execute element rendering
    const tempContext = this.context;
    this.context = context;
    display0bject.renderCanvas(this);
    this.context = tempContext;
    // 4. Restore previous state from state stack
    context.restore();
}
Game Development Skill Tree

PixiJS + Web Development
Pixi Introduction
PixiJS At first glance, the official website looks like a game engine, but it clearly states: “Create beautiful digital content with the fastest, most flexible 2D WebGL renderer.”
- It’s essentially a rendering engine, and claims to be the best one.
- It’s not limited to games - you can use this technology to create any interactive content, such as apps, and you can build your own game engine on top of it. (AVG.js and Phaserjs use Pixi as their rendering engine)
Prerequisites:
- Web frontend development basics
- Have used JSON files and know what they’re for
- Some familiarity with Canvas drawing APIs
Loading a Game into a Web Project
-
Installation and Import
- npm install or import via script tag
<script src="pixi.min.js" ></script>
- npm install or import via script tag
-
Create a Pixi Application and Stage
// Step 1: Create a display rectangle. Creating a Pixi application instance automatically creates a canvas and calculates how to display images in it. let app = new PIXI.Application({ width: 250, height: 250 }); // app.stage is a [stage] that contains everything you want to display with Pixi. // Step 2: Add the canvas to the DOM Tree. This displays a 250x250 pure black interface. document.body.appendChild(app.view); // PIXI.Application calculates whether to use Canvas or WebGL for rendering, depending on browser support. WebGL is generally preferred. // If you want the Canvas to be transparent, or force Canvas mode: let app = new PIXI.Application({ width: 250, height: 250, transparent: true, forceCanvas: true, }); -
Display an Image
Concept: Sprite
-
You may have heard of sprite sheets when learning CSS, but this is different. In Pixi and other game engines, a Sprite is an object that holds an image. You can control its size, position, and other properties to create interactions and animations. Creating and controlling Sprites is a crucial part of learning Pixi.
-
Creating a Sprite requires understanding how images are loaded into Pixi. Here’s a concept: Texture Cache (images that can be processed by the GPU)
-
Pixi uses texture cache to store and reference textures needed by Sprites. The texture name string is the image path. For example, with “images/cat.png”, we can use
PIXI.utils.TextureCache["images/cat.png"]to find it in the texture cache. -
To find it, you first need to convert and store it as a texture in the texture cache, using
PIXI.loader:PIXI.loader.add('images/cat.png').load((res) => { let sprite = new PIXI.Sprite(PIXI.loader.resources['images/cat.png'].texture); });
-
-
Now a Sprite has been created. The next step is to display it by adding it to the stage:
app.stage.addChild(sprite);
-
-
Making the Image Move
We mentioned earlier that you can set a Sprite’s position and size. What if we want to move one pixel per frame? That’s when we need a game loop (any code in the game loop is called once per frame).
app.tiker.add((delta) => { sprite.x += 11; }); -
Then add a billion more details: CacheAsBitmap - PixiJS Examples
Cocos Creator Editor Development
Cocos Creator Introduction
Q: Is Cocos Creator a game engine?
A: Cocos + editor interface. It’s a complete game development solution that includes a lightweight, efficient cross-platform game engine and various graphical interface tools to help you develop games faster.
Integrated Editor Capabilities
Cocos Workflow
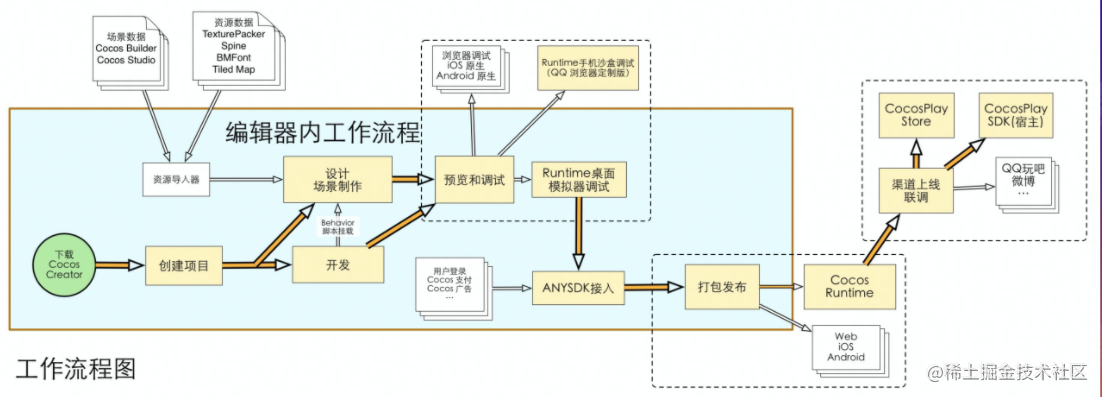
Download and create -> Design scenes & develop -> Preview and debug -> ANYSDK integration -> Package and publish -> Cocos Runtime
The diagram above shows Cocos’s workflow.
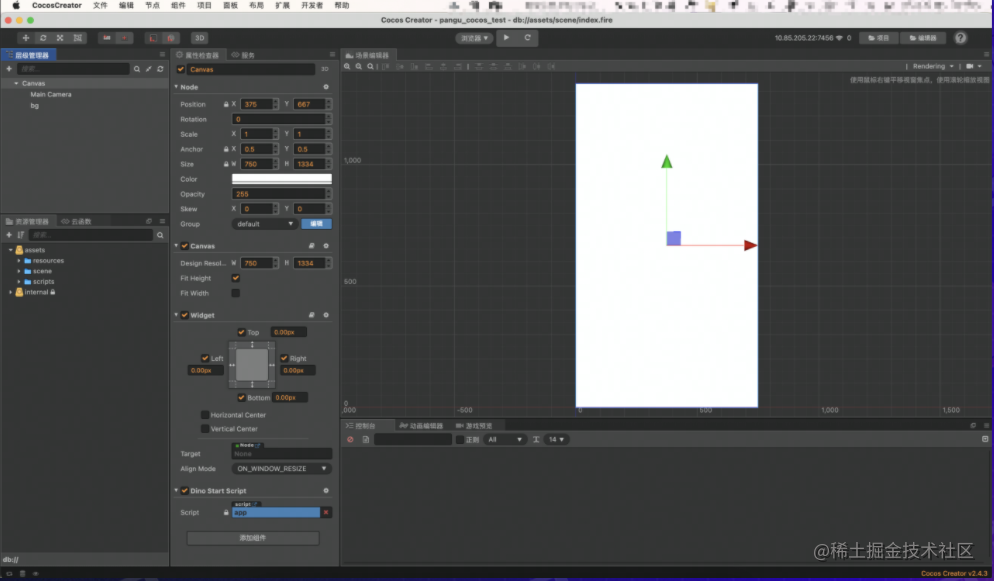
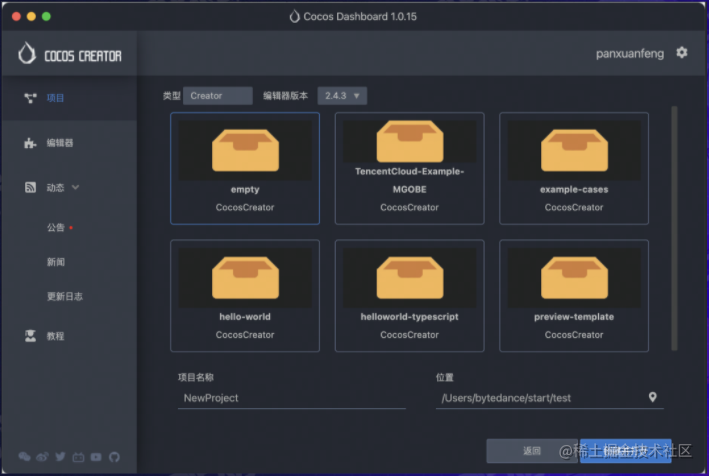
Creating a Project
Building Scenes
Cocos workflow - data-driven, scene-centric, component-based development
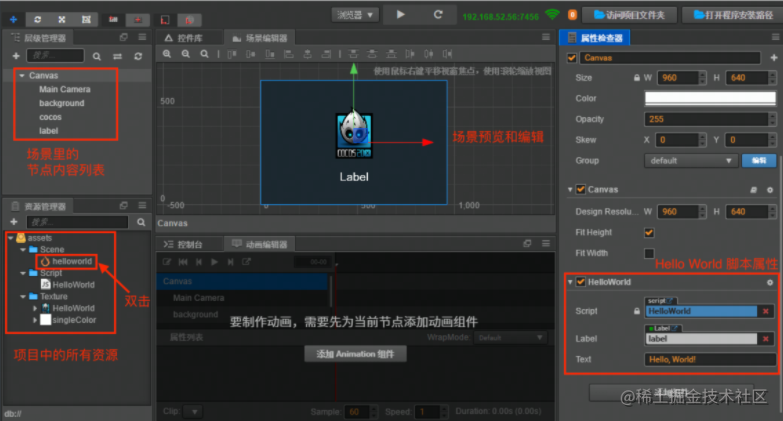
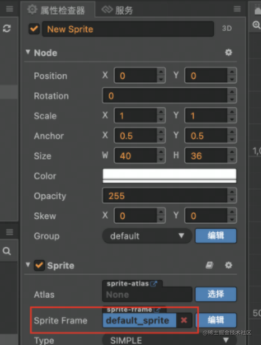
As you can see, no need to understand CSS - you can adjust image size and more directly through the property inspector on the right, low-code style.
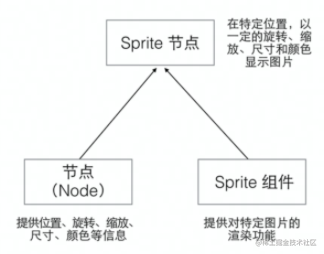
Nodes (cc.Node) are entities that host components. We mount components with various functionalities (such as Sprite, Spine, Label) onto nodes to give them various appearances and behaviors.
Nodes form a node tree, which affects the actual rendering hierarchy.
Importing and Displaying Assets
Drag files from other OS windows to the Cocos Creator asset manager panel to import external assets. This automatically copies asset files to the project asset folder and completes the import. Then drag images to the hierarchy manager to generate a cc.Sprite.
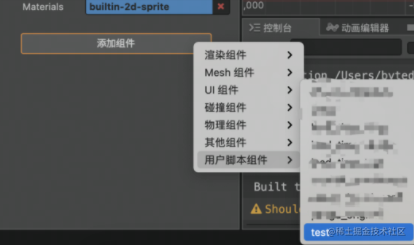
Script Mounting
test.js
const { property, ccclass } = cc._decorator;
@ccclass
export default class TestComp extends cc.Component {
  onLoad() {
    console.log('TestComp onload');
  }

  start() {}

  update(dt) {}

  onDestroy() {}
}
Then mount the script to the corresponding node in Cocos Creator.
Running and Debugging

Game Launch
Building
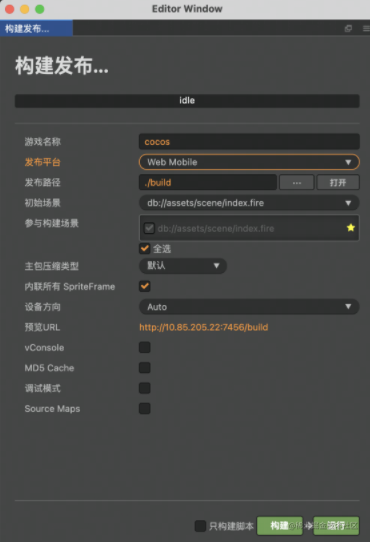
Build the game, select multiple platforms, and the build output is generated accordingly, such as Web Mobile.
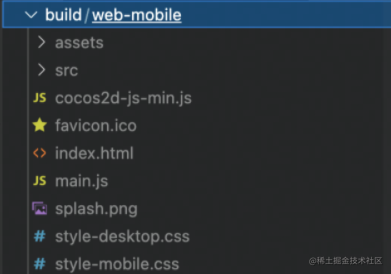
The output can be directly deployed to the corresponding platform, such as web output to servers, mini game output to developer platforms.
What Makes Mini Games “Mini”
Platform Differences in Game Publishing
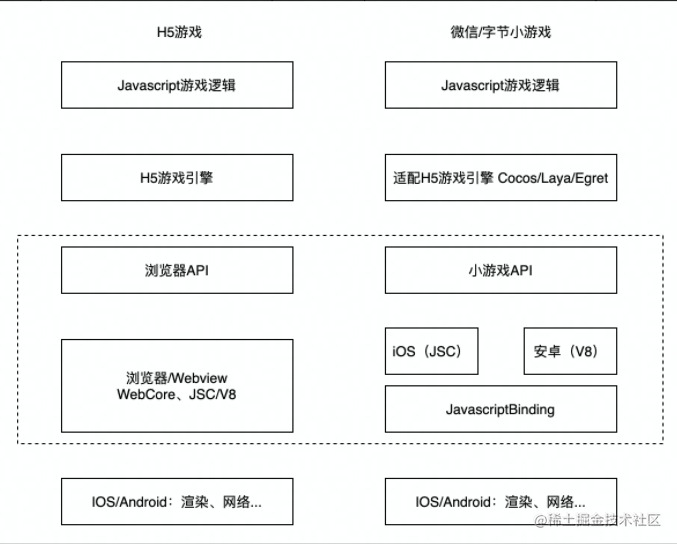
-
In terms of game logic, there’s no significant difference
-
Different game engines
-
Platform API differences (most important to pay attention to)
-
Rendering differences are minimal
Important Concepts in Game Development
Inspiring Creativity
- Treat the game development process as a game itself - within the constraints of rules (your tech stack, defined themes, limited resources), challenge yourself to create a high-quality game through creativity and technical skill!
- Don’t let creativity be constrained
Summary and Reflections
This lesson covered the differences between game development in frontend scenarios and regular game development, introduced some game engines, provided a game development skill tree, and briefly introduced the steps for developing games using Cocos Creator or PixiJS.
Most of the content cited in this article comes from Teacher ycaptain’s class.
喜欢的话,留下你的评论吧~