
This article has been machine-translated from Chinese. The translation may contain inaccuracies or awkward phrasing. If in doubt, please refer to the original Chinese version.
Introduction
Recently, I needed to handle batch compression of a large number of historical images on someone else’s server. Due to legacy reasons, public/uploads had accumulated quite a few high-resolution panoramic and regular photos, taking up more and more storage space. While I’ve been using sharp-cli, @napi-rs/image, and similar tools for image processing in production frontend environments, this time the scenario was batch compression of already-stored historical images, and the environment provided was a bastion host where I could only operate through a web terminal — no GUI — requiring more flexible command-line tools.
This article documents the complete process, hoping to help others with similar needs.
Why Not sharp-cli?
sharp-cli and @napi-rs/image are generally my first choice in production environments, with excellent performance and friendly APIs. But this requirement was batch processing large numbers of already-stored images, and sharp-cli is better suited for integration into build pipelines or Node.js scripts. For this kind of one-off batch operation, traditional ImageMagick/libvips command-line tools are more straightforward.
Tool Comparison
Before compressing, I looked at these tools:
| Tool | Advantages | Disadvantages | Suitable Scenarios |
|---|---|---|---|
| ImageMagick | Comprehensive features, rich documentation | High memory usage for large images | General image processing |
| libvips | Stream processing, extremely efficient memory usage | Relatively focused feature set | Very large images / batch processing |
| sharp-cli | Excellent performance, friendly API | Requires Node.js environment | Build pipeline integration |
| Squoosh CLI | Modern format support (WebP/AVIF) | No longer maintained | Not recommended for production |
| guetzli/mozjp | Extreme compression (JPEG) | Extremely slow processing | Maximum compression ratio scenarios |
Final choice: ImageMagick + libvips combination
- Initially used ImageMagick for regular images under 10MB — fast and convenient, but discovered that very large images (100MB+) would run out of memory.
- libvips is the underlying library used by sharp, handling very large panoramic photos (100MB+) with ease.
infographic compare-hierarchy-left-right-circle-node-pill-badge
data
  title Tool Selection Strategy
  items
    - label ImageMagick
      children
        - label Regular Images
          desc Images <10MB
        - label Comprehensive Features
          desc Supports various format conversions
        - label Simple Syntax
          desc One-line mogrify command
    - label libvips
      children
        - label Very Large Images
          desc 100MB+ panoramas
        - label Memory Efficiency
          desc Stream processing without memory overflow
        - label sharp's Foundation
          desc Production-grade performance guarantee
Preparation
infographic list-row-simple-horizontal-arrow
data
  title Workflow
  items
    - label Check Capacity
      desc Check remaining disk space
    - label Measure Size
      desc Assess file sizes before compression
    - label Backup Data
      desc Prevent accidental operations
    - label Execute Compression
      desc Use appropriate tools
The two most important points are of course:
- Check the total size of all images
- Back up the images you want to compress (because mogrify compresses directly on the original files, so backup is critical)
# du (disk usage)
# -sh: Only show total size for each argument, in human-readable format (K, M, G)
# sort -hr: Sort in reverse order by size
du -sh * | sort -hr
# List only those starting with 17
du -sh 17* | sort -hr
Output looks like:
root@3d:/myapp/storage/uploads/panorama/backup# du -sh * | sort -hr
147M    1766019200667-1c2d8x.jpg
130M    1766019053272-aylt0b.jpg
120M    1766019107903-jl2i2s.jpg
63M     1765977415640-hu7yap.jpg
……
Then backup. Before backing up, remember to check available disk space with df -h.
df -h
# If there's enough space, proceed with backup
tar -cvf uploads_backup_$(date +%Y%m%d).tar uploads/
# Or for example, to back up files starting with 17
tar -czvf backup_17_$(date +%Y%m%d).tar.gz 17*
# Back up all files starting with 17 that are larger than 10M
tar -czvf backup_17_large_$(date +%Y%m%d).tar.gz $(find . -name "17*" -size +10M)
This backs up the upload directory as an uploads_backup_20251223.tar file.
Tool Installation
Now it’s time to start compressing.
ImageMagick
# Debian/Ubuntu
sudo apt update && sudo apt install imagemagick -y

# macOS
brew install imagemagick

# Verify
magick -version
Note that newer ImageMagick 7+ recommends using the magick command, but the server had an older version so I used the legacy syntax.
libvips
# Debian/Ubuntu
sudo apt install libvips-tools -y

# macOS
brew install vips

# Verify
vipsthumbnail --version
Pitfalls Encountered
Memory Overflow with Very Large Images
When processing a 150MB panoramic photo, I encountered a cache resources exhausted error:
# Assuming files starting with "change" are the images we want to batch compress
# Original images might be 20000x+, can resize to below 9000x
mogrify -quality 75 -resize "9000x>" ./change*.jpg
Root Cause:
ImageMagick uses a load-entire-image-into-memory processing approach:
For a 150MB aerial panoramic JPEG file, its actual resolution can reach around 23000x11000. The uncompressed pixel data size is:
20000 x 10000 x 3 bytes = 600MB (RGB format)
ImageMagick also needs during processing:
- Create multiple intermediate buffers
- Store transformation matrices
- Save temporary results
Therefore, actual memory usage can reach 900MB-2GB, exceeding the default resource limits. (I’m not sure if this description is entirely accurate, but the small server couldn’t handle it.)
ImageMagick struggles with very large images, so I brought in libvips.
# 1. First see what files we have
find . -maxdepth 1 -name "17*.jpg" -size +10M -exec ls -lh {} \;

# 2. Backup (just to be safe)
tar -czvf backup_17_10M_$(date +%Y%m%d).tar.gz 17*.jpg

# 3. Execute compression
for f in 17*.jpg; do
  size=$(stat -c%s "$f" 2>/dev/null)
  if [ $size -gt 10485760 ]; then
    echo "Compressing: $f ($(du -h "$f" | cut -f1))"
    vipsthumbnail "$f" -s 9000 -o "temp_[Q=75].jpg"
    if [ -f "temp_.jpg" ]; then
      mv "temp_.jpg" "$f"
      echo "Done: $f → $(du -h "$f" | cut -f1)"
    fi
  fi
done

# 4. Check results
du -sh 17*.jpg | sort -hr
Note that [Q=75] in temp_[Q=75].jpg gets replaced with an empty string — this is vipsthumbnail’s filename substitution rule.
In the vipsthumbnail command, the -o parameter supports special placeholder substitutions. [Q=75] is a save option placeholder that specifies JPEG quality.
In the final generated filename, this part is removed (replaced with empty string).
Large image compression completed successfully.
Subdirectory mogrify Batch Compression
Note that mogrify compresses directly on the original files, so backup is critical.
For smaller images, use ImageMagick’s mogrify for in-place batch modification:
# First backup
cp -r . ../backup_before_mogrify/
# In-place modification (mogrify)
mogrify -quality 75 -resize "4000x>" input.jpg
# Or output to new file (convert)
convert input.jpg -quality 75 -resize "4000x>" output.jpg
Other commonly used resize options:
"4000x>"     # Only shrink, width limited to 4000px
"4000x4000>" # Only shrink, neither width nor height exceeds 4000px
"50%"        # Shrink to 50%
"4000x3000!" # Force scale to specified dimensions (may distort)
There are many subdirectories:
root@3d:/myapp/storage/uploads/panorama# du -sh * | sort -hr
131M    cmjpqjihk002mlm01qyyk3vqc
131M    cmjpp9pfk001ulm01dr2aina9
129M    cmjxtmsfs00eilm01iso8kaq2
128M    cmja74wwh00fcl701ie777fnj
127M    cmja751nb00fel701u4oqmgfk
126M    cmk0yw2zx004nlp01i7r22uoe
Inside are relatively smaller images in this format:
root@3d:/myapp/storage/uploads/panorama/cmjpqjihk002mlm01qyyk3vqc# du -sh * | sort -hr
26M     cmjpqjihk002mlm01qyyk3vqc.right.jpg
26M     cmjpqjihk002mlm01qyyk3vqc.left.jpg
25M     cmjpqjihk002mlm01qyyk3vqc.back.jpg
24M     cmjpqjihk002mlm01qyyk3vqc.front.jpg
18M     cmjpqjihk002mlm01qyyk3vqc.bottom.jpg
13M     cmjpqjihk002mlm01qyyk3vqc.top.jpg
So I just used mogrify -quality 75 -resize "4000x>" ./public/uploads/**/*.jpg directly — faster that way.
I needed to compress directories larger than 20M, and batch cd into each directory, process, then cd .., while also monitoring progress:
First, back up directories larger than 20M:
backup_file="../panorama_backup_$(date +%Y%m%d_%H%M%S).tar.gz"
dirs_to_backup=""

for dir in */; do
  size=$(du -sm "$dir" | cut -f1)
  if [ $size -gt 20 ]; then
    echo "Adding to backup: $dir ($size MB)"
    dirs_to_backup="$dirs_to_backup $dir"
  fi
done

tar -czf "$backup_file" $dirs_to_backup
echo "Backup complete: $backup_file"
Notes
-mindu -smspecifies the unit as MB (megabytes)-sis summarize-mis megabytescut -f1extracts the first column (the number part)tar -czfcreates a gzip-compressed tar archive file named backup.tar.gz-c= create a new archive-z= gzip compression-f= specify file
Start compression, using mogrify -quality 75 -resize "4000x>" "$img" (ImageMagick 7+ recommends magick mogrify instead of the legacy mogrify)
Using ImageMagick to compress and resize images:
mogrifydirectly modifies the original image (doesn’t create a copy)-quality 75sets JPEG quality to 75%-resize "4000x>"shrinks if width exceeds 4000 pixels while maintaining aspect ratio;>means only shrink, never enlarge
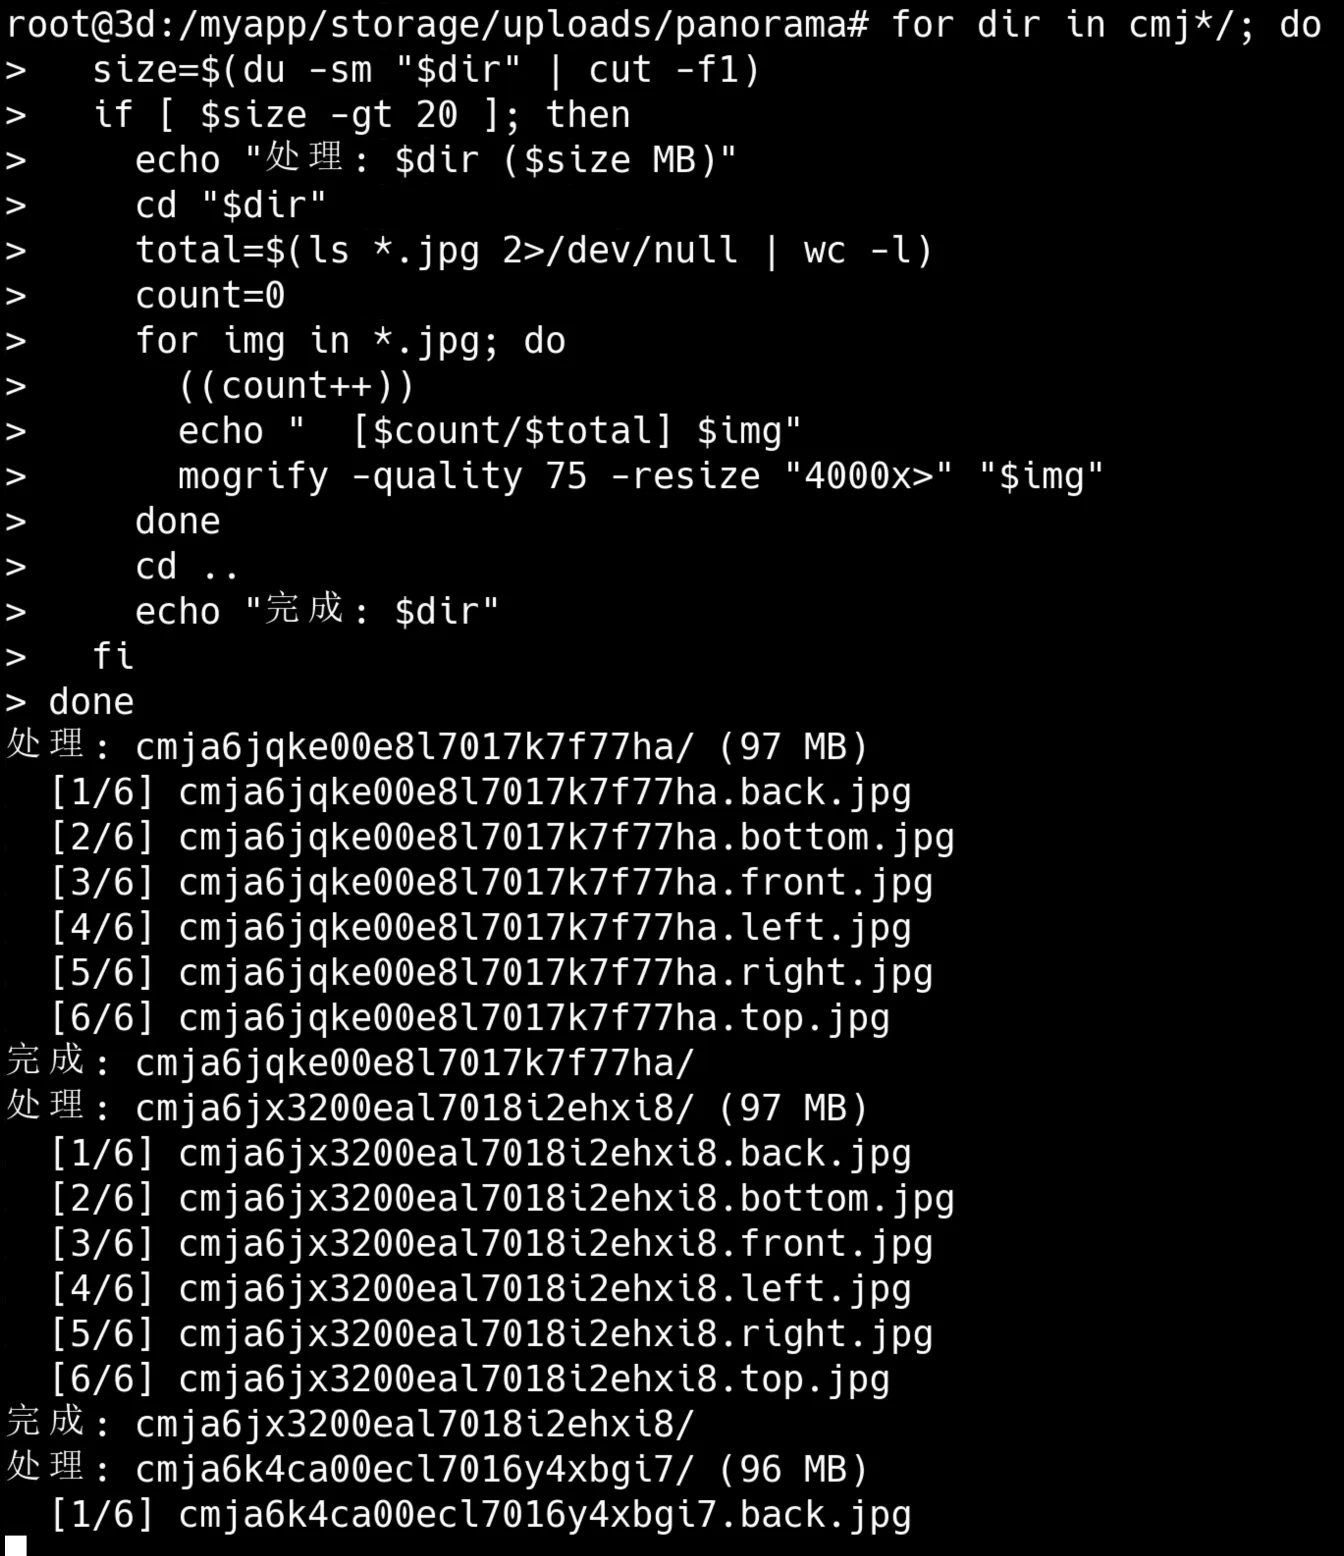
The following command does roughly this:
- Iterates through all subdirectories starting with cmj, checking each directory’s size
- Filters directories larger than 20 MB for processing (skips already-compressed small directories)
- For qualifying directories: enter directory -> count JPG files -> process each JPG image -> reduce quality to 75%, shrink to 4000 pixels wide if exceeding (maintaining aspect ratio)
- Shows real-time progress (e.g., [3/10] photo.jpg)
- After completion, returns to parent directory and continues with next directory
for dir in cmj*/; do
  size=$(du -sm "$dir" | cut -f1)
  if [ $size -gt 20 ]; then
    echo "Processing: $dir ($size MB)"
    cd "$dir"
    total=$(ls *.jpg 2>/dev/null | wc -l)
    count=0
    for img in *.jpg; do
      ((count++))
      echo "  [$count/$total] $img"
      mogrify -quality 75 -resize "4000x>" "$img"
    done
    cd ..
    echo "Done: $dir"
  fi
done
Notes
-linwc -lcounts lines((count++))is bash’s arithmetic syntax for incrementing a variable by 1mogrifyis an ImageMagick tool that directly modifies the original file without creating a copy-quality 75sets JPEG compression quality to 75% (0-100, higher values mean better quality but larger files)>in-resize "4000x>"means “only shrink, never enlarge” — if image width is <=4000, no processing occurs
Extremely effective.
Closing Thoughts
Why Not Just Use sharp-cli?
sharp is excellent, and I consistently use it in production image upload workflows. But for batch compression of already-stored historical images, traditional command-line tools are more flexible:
- No need to write Node.js scripts
- Use shell pipes/find combinations directly
- libvips itself is the underlying engine of sharp
- Next time just modify the commands slightly
How to Achieve Optimal Compression?
For more refined compression quality, check out this Stack Overflow post that specifically discusses using ImageMagick to compress JPEG image files to achieve minimal file size without losing too much quality.
Below is an AI-assisted summary of the key points from that post:
The Problem
The original poster (Javis Perez) encountered these issues:
- Poor compression results: Unable to achieve significant file size differences when compressing JPEG files with ImageMagick.
- Output files were actually larger: By default, output image files were even larger than input files.
- Still unsatisfactory after attempts: Even with
+profile "*"and-quality 70options, the output file (264KB) was still close to or slightly larger than the input (255KB). - Clear goal: Wanted to compress images to at least 150KB and sought ImageMagick options to achieve this.
Solutions
The post provided multiple solutions and parameter combinations, summarized as follows:
-
Core Parameter Combination (Most Recommended and Upvoted):
- Command:
convert -strip -interlace Plane -gaussian-blur 0.05 -quality 85% source.jpg result.jpg - Parameter Explanation:
-quality 85%: Sets JPEG compression quality to 85% (adjustable based on needs, typically between 60-85; lower numbers mean smaller files but more quality loss).-strip: Removes all metadata from the image (EXIF info, comments, etc.), an effective lossless method to reduce file size.-interlace Plane(or-interlace JPEG): Creates progressive JPEG, which doesn’t directly reduce file size but improves the loading experience on the web.-gaussian-blur 0.05: Applies a very small (e.g., 0.05) Gaussian blur. This parameter is controversial — some users believe it smooths noise in images, thus improving compression ratio and significantly reducing file size; others feel it causes image blur and suggest simply lowering-qualityinstead.
- Command:
-
Google PageSpeed Insights Recommended Optimization:
- Command:
convert image.jpg -sampling-factor 4:2:0 -strip -quality 85 -interlace JPEG -colorspace RGB image_converted.jpg - Parameter Explanation:
-sampling-factor 4:2:0: Chroma subsampling, reducing the chrominance channel sampling rate by half while not affecting the luminance channel. Human eyes are more sensitive to luminance changes than chrominance changes, so this method can significantly reduce file size without noticeably affecting visual quality.-strip,-quality 85, and-interlace JPEG: Same as above.-colorspace RGB: Ensures the image is processed in the correct RGB color space.
- Additional Option:
-define jpeg:dct-method=float: Uses a more precise floating-point Discrete Cosine Transform (DCT) instead of the default fast integer version, which can slightly improve conversion fidelity without increasing file size.
- Command:
-
Directly Specifying Target File Size:
- Command:
convert image.jpg -define jpeg:extent=150kb result.jpg - Parameter Explanation:
-define jpeg:extent=: Since ImageMagick v6.5.8-2, you can directly specify the maximum JPEG output file size (e.g., “150kb”). ImageMagick automatically adjusts quality to meet this target size. This is the most direct solution to the original “compress to 150kb” question, but quality loss will occur.
- Command:
-
Image Dimension Adjustment (Most Significant File Size Reduction):
- Command (Example):
mogrify -quality "97%" -resize 2048x2048 -filter Lanczos -interlace Plane -gaussian-blur 0.05 - Parameter Explanation:
-resize WxHor-adaptive-resize X%: Adjusts image dimensions. This is one of the most effective methods for reducing file size, especially for high-resolution images.-filter Lanczos: A high-quality scaling filter (usually the default).
- Note: Reducing image dimensions changes the actual pixel data.
- Command (Example):
-
Other Considerations and Suggestions:
- Batch Processing: For multiple files, use the
mogrifycommand instead ofconvert. For example:mogrify -strip -interlace Plane -gaussian-blur 0.05 -quality 85% *.jpg. Note:mogrifyoverwrites original files — always back up before using. - Quality vs. Blur Trade-off: The post repeatedly mentions the controversy around
-gaussian-blur. Many users believe simply lowering-qualityis sufficient, or combining with-sampling-factor 4:2:0is more effective, avoiding unnecessary blur. For large images, slight blur may be imperceptible; for small images, the effect may be poor. - External Tools: Recommended tools like ImageOptim, pngquant, etc. for further lossless or lossy optimization.
- Side Effects of Re-compression: Comments note that re-compressing already-compressed JPEGs, even if file size increases, will still degrade image quality.
- Batch Processing: For multiple files, use the
Refs
- convert and mogrify: The correct way to use them in modern versions of ImageMagick
- Best options parameters for ImageMagick to compress JPEGs files to the minimal size without losing too much quality?
- ImageMagick Official Docs
- libvips Documentation
- sharp - High performance Node.js image processing
- cwebp - WebP encoder
This article is under continuous revision. Feel free to leave a comment if you spot any errors or omissions.
喜欢的话,留下你的评论吧~