This article has been machine-translated from Chinese. The translation may contain inaccuracies or awkward phrasing. If in doubt, please refer to the original Chinese version.
Introduction and Examples
Here’s the thing: I’ve been wanting to collect some of the interactive features and WebGL-related demos I’ve built before, and write a few blog posts to document them. There are still many shortcomings, such as performance that urgently needs optimization, and all corrections are welcome. This is the first article; the next one will be about another particle system built on top of this one with modifications.
The first effect I’ll cover is this: Particles to Image. The following implementation is based on modifications and refactoring of that original work — feel free to check out the original code.
Refactoring, porting to React, and adding TypeScript type declarations took some time, along with various detail adjustments. Here’s the result after porting:
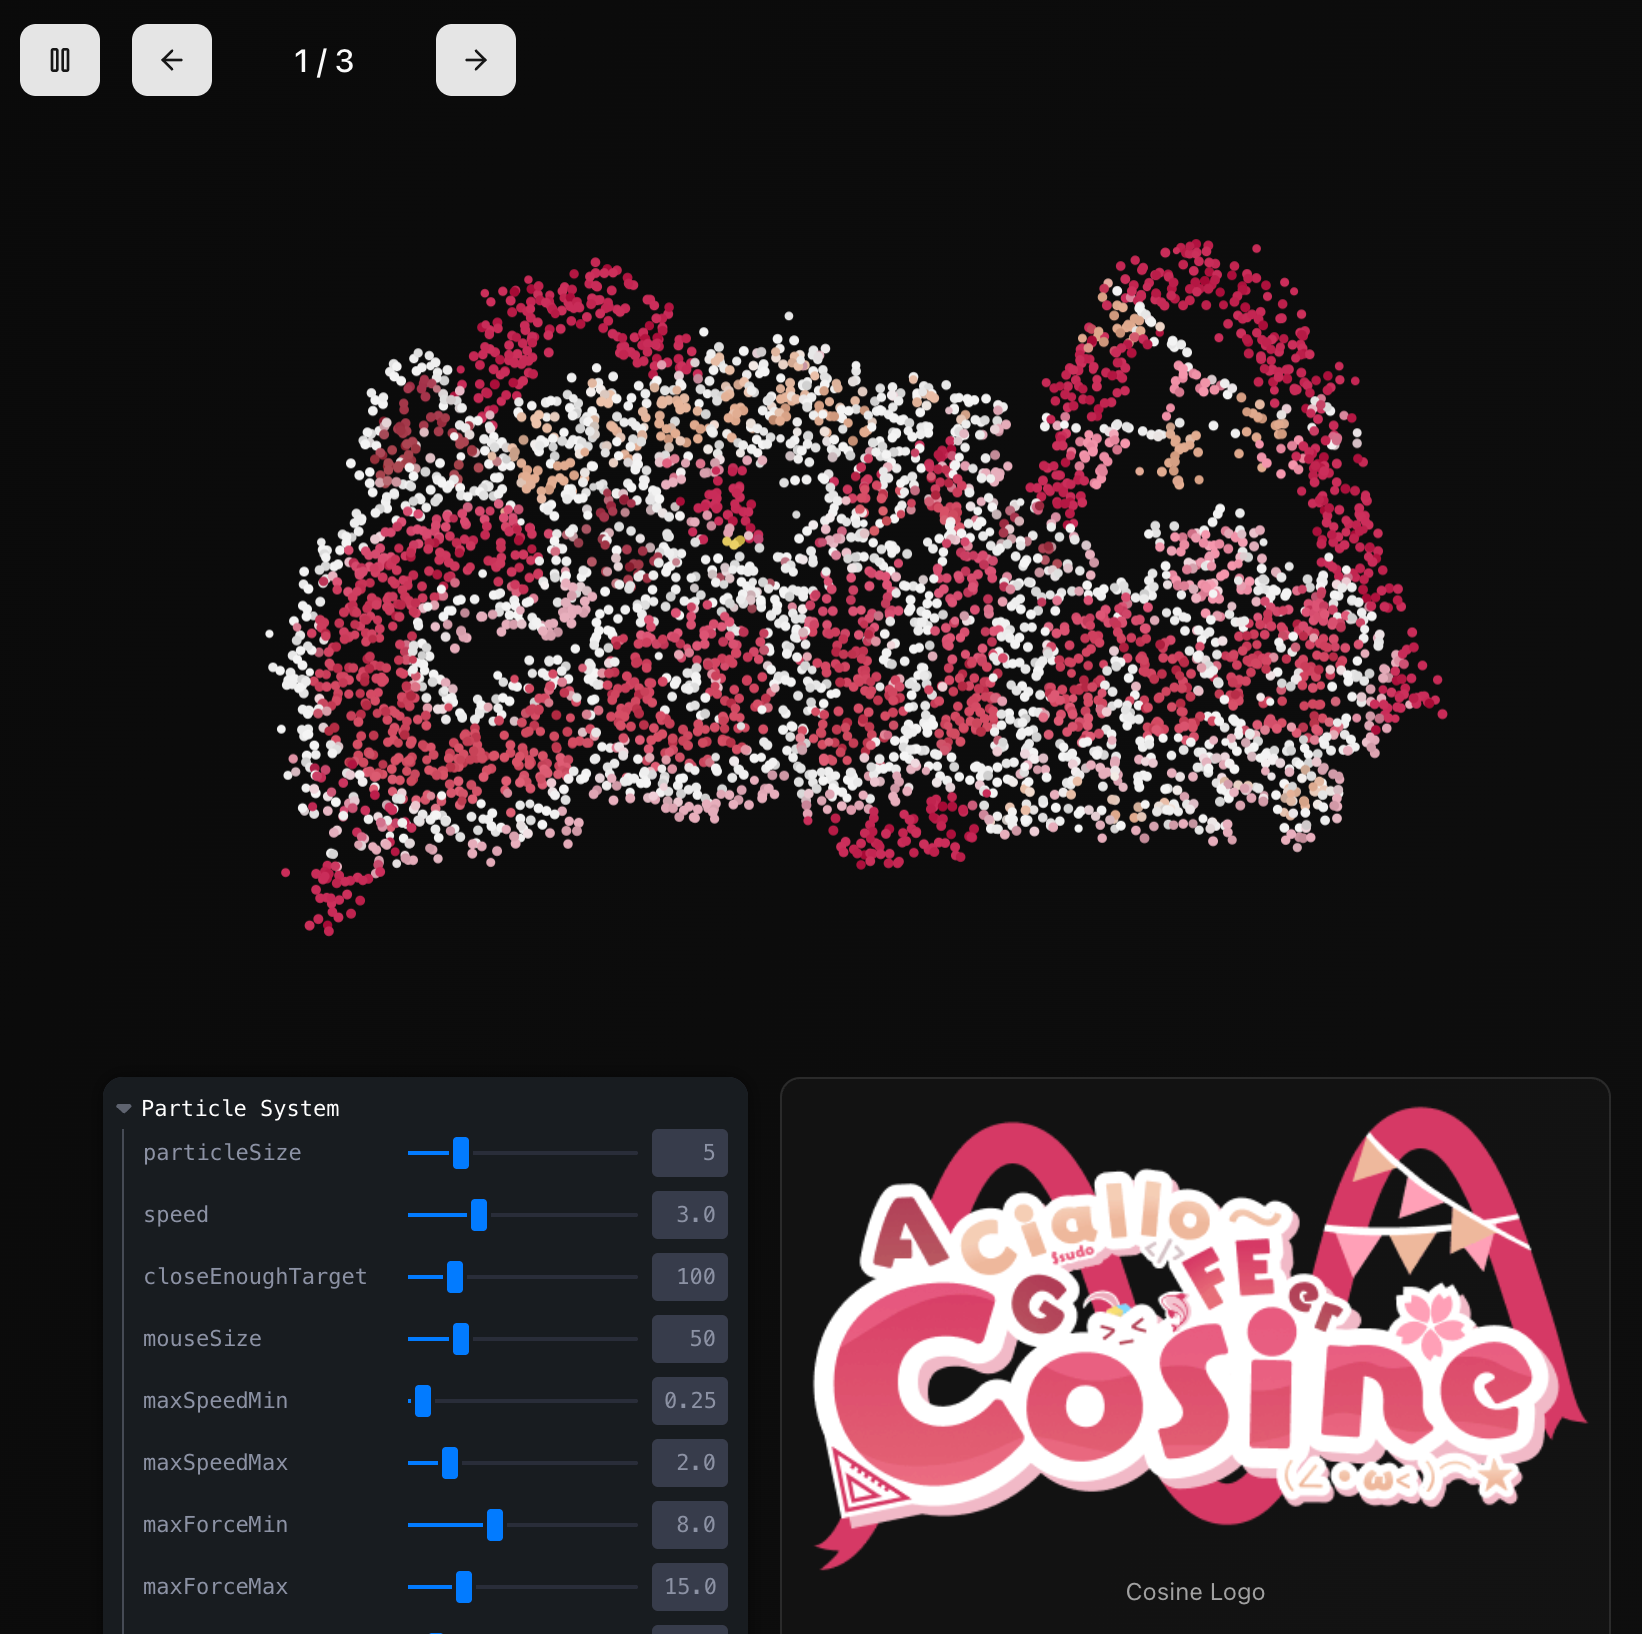
Live demo: https://p5-three-lab.vercel.app/examples
This blog post and the project setup were written in a bit of a rush, so there are many rough areas. After all, it was built to serve a need, and the refactoring itself was already rushed — I’ll keep improving it going forward.
Some paragraphs were polished with AI assistance. While they may sound a bit AI-generated, they’re easy to understand so I kept them.
Concept and Design Philosophy
The core idea of this dynamic particle system is to convert static images into dynamic particle collections, where each particle represents a pixel from the original image. Through physics simulation, particles smoothly transition between different images, creating visually dynamic effects.
The entire system can be summarized in four key stages:
- Image Deconstruction: Decompose the input image into pixel data, extracting color and position information
- Particle Mapping: Create a corresponding particle object for each valid pixel, establishing the mapping between images and particles
- Physics Simulation: Implement particle motion rules, including target seeking, noise perturbation, mouse interaction, etc.
- Seeking Behavior: Particles move toward target positions
- Noise Perturbation: Add Perlin noise for a natural feel
- Interaction Response: Mouse hover repels, click attracts
- Proximity Deceleration: Gradually slow down when approaching the target to avoid oscillation
- Progressive Rendering: Achieve smooth visual effects through color interpolation (
lerpColor) and size transitions, making image transitions look natural and fluid.
- Visual Reconstruction: Rebuild visual effects through changes in particle positions and colors, achieving dynamic image representation
Among 2D libraries, p5.js is relatively mature. In cases where 3D is completely unnecessary, it provides rich graphics and math functions like loadPixels(), lerpColor(), P5.Vector, etc. Its built-in vector class greatly simplifies vector calculations.
The original code controls particle density through loadPercentage and resolution parameters.
Particle System Architecture Overview
First, let’s look at the system configuration and type definitions. We want transition effects when switching particles, and the ability to pause and resume animations through activeAnim.
export type MySketchProps = SketchProps & {
  activeAnim: boolean;
  imageIdx: number; //
  id?: string;
  particleConfig?: ParticleConfig;
};

// Particle configuration interface
type ParticleConfig = {
  closeEnoughTarget: number; // Target proximity distance
  speed: number; // Movement speed
  mouseSize: number; // Mouse influence radius
  scaleRatio: number; // Scale ratio
  particleSize: number; // Particle size
  maxSpeedRange?: [number, number]; // Max speed range
  maxForceRange?: [number, number]; // Max force range
  colorBlendRate?: [number, number]; // Color blend rate
  noiseScale?: number; // Noise scale
  noiseStrength?: number; // Noise strength
};
Image Preprocessing and Pixel Sampling
First, we preprocess the input images, including resizing and pixel data extraction:
p5.preload = () => {
  for (let i = 0; i < sourceImgInfos.length; i++) {
    const img = p5.loadImage(sourceImgInfos[i].url);
    const [width, height] = sourceImgInfos[i]?.resize ?? [0, 0];
    const scaleNum = sourceImgInfos[i]?.scaleNum ?? defaultConfig.scaleNum;

    if (width && height) {
      img.resize(width * scaleNum, height * scaleNum);
    } else {
      img.resize(img.width * scaleNum, img.height * scaleNum);
    }
    sourceImgs.push(img);
  }
};
The key step is p5.loadImage, which returns a p5.Image object. This object contains the loadPixels method, which loads the current values of each pixel in the image into the img.pixels array — we’ll use this next.
Other considerations: Image dimensions need to be dynamically adjusted based on device type (mobile/desktop). Mobile devices have lower performance, so both scaleNum and image resize dimensions need to be adjusted to balance visual quality and performance. If the original image is too large, it should be scaled down before calling loadImage, then the generated result can be scaled back up.
Image Switching: setImageIdx
The image switching section is responsible for converting image pixel data into target positions and colors for particles. Let’s dive into each key step. Here’s the complete code:
function setImageIdx(idx: number) {
  // 1. Parameter destructuring with default values
  const {
    loadPercentage = defaultConfig.loadPercentage, // Particle load density (default: 0.0007)
    resolution = defaultConfig.resolution, // Resolution multiplier (mobile: 15, desktop: 5)
  } = sourceImgInfos[idx] ?? {};
  const sourceImg = sourceImgs[idx];

  // 2. Load image pixel data
  sourceImg.loadPixels();

  // 3. Object pool initialization
  const preParticleIndexes = allParticles.map((_, index) => index);

  // 4. Pre-calculate random sampling threshold
  const randomThreshold = loadPercentage * resolution;

  // 5. Pixel traversal and particle assignment
  for (let y = 0; y < imgHeight; y++) {
    for (let x = 0; x < imgWidth; x++) {
      // 6. Read RGBA pixel data
      const pixelR = sourceImg.pixels[pixelIndex++];
      const pixelG = sourceImg.pixels[pixelIndex++];
      const pixelB = sourceImg.pixels[pixelIndex++];
      const pixelA = sourceImg.pixels[pixelIndex++];

      // 7. Transparency filter optimization (if alpha < 128, we consider it transparent and skip)
      if (pixelA < 128) continue;

      // 8. Random sampling to control particle density
      if (p5.random(1.0) > randomThreshold) continue;

      const pixelColor = p5.color(pixelR, pixelG, pixelB);
      let newParticle: Particle;

      // 9. Smart particle object pool management
      if (preParticleIndexes.length > 0) {
        // 9a. Randomly select an existing particle for reuse
        const randomIndex = Math.floor(p5.random(preParticleIndexes.length));
        const index = preParticleIndexes[randomIndex];
        // 9b. O(1) fast removal strategy: move the last element to the current position
        preParticleIndexes[randomIndex] =
          preParticleIndexes[preParticleIndexes.length - 1];
        preParticleIndexes.pop();
        newParticle = allParticles[index];
      } else {
        // 10. Create new particle - only when object pool is exhausted
        newParticle = new Particle(
          p5.width / 2, // Initial x coordinate (canvas center)
          p5.height / 2, // Initial y coordinate (canvas center)
          p5,
          IS_MOBILE,
          currentParticleConfig
        );
        allParticles.push(newParticle);
      }

      // 11. Coordinate transformation and setting particle target position
      newParticle.target.x = x + p5.width / 2 - sourceImg.width / 2;
      newParticle.target.y = y + p5.height / 2 - sourceImg.height / 2;
      newParticle.endColor = pixelColor;
    }
  }

  // 12. Clean up unassigned particles
  const preLen = preParticleIndexes.length;
  if (preLen > 0) {
    for (let i = 0; i < preLen; i++) {
      const index = preParticleIndexes[i];
      allParticles[index].kill(); // Mark as dead
      allParticles[index].endColor = p5.color(0); // Set to transparent
    }
  }
}
Understanding the Pixel Data Structure
In p5.js, the pixels array is a one-dimensional array stored in RGBA order.
- For a 100x100 image, the array length is
100 * 100 * 4 = 40,000 - Index calculation: The R channel of pixel(x,y) is at position
((y * width + x) * 4)
// The pixels array in p5.js is a one-dimensional array stored in RGBA order
// For a 100x100 image, the array length is 100 * 100 * 4 = 40,000
// Index calculation: The R channel of pixel(x,y) is at position ((y * width + x) * 4)
const pixelIndex = (y * sourceImg.width + x) * 4;
const [r, g, b, a] = [
  sourceImg.pixels[pixelIndex], // Red
  sourceImg.pixels[pixelIndex + 1], // Green
  sourceImg.pixels[pixelIndex + 2], // Blue
  sourceImg.pixels[pixelIndex + 3], // Alpha
];
Object Pool Pattern Analysis
Perhaps it shouldn’t be called that, but for the sake of clarity let’s use this name for now.
The object pool is the performance core of this algorithm, solving the memory fragmentation problem caused by frequent object creation/destruction. Think of the object pool as a “particle recycling station”:
Imagine you’re playing with building blocks. Every time you build a new model, you have two choices:
- Wasteful approach: Buy new blocks from the store each time and throw them away after use (equivalent to frequently creating new objects)
- Eco-friendly approach: Collect used blocks and reuse them directly next time (equivalent to the object pool pattern)
Obviously the second approach is more efficient — this is the core idea of object pooling.
// Traditional method (poor performance):
for (const pixel of pixels) {
  const particle = new Particle(); // Create new object every time
  particles.push(particle);
}

// Object pool optimized method:
const preParticleIndexes = allParticles.map((_, index) => index);
// This creates an index array [0, 1, 2, ..., n-1]

// Random selection strategy avoids visual regularity
const randomIndex = Math.floor(p5.random(preParticleIndexes.length));
const actualIndex = preParticleIndexes[randomIndex];

// O(1) removal trick: swap and pop
preParticleIndexes[randomIndex] =
  preParticleIndexes[preParticleIndexes.length - 1];
preParticleIndexes.pop();
The Math Behind Random Sampling
Random sampling is the core mechanism for controlling particle density. Imagine if we created a particle for every pixel in the image — a 1000x1000 image would produce 1 million particles, which would crash the browser. So we need a “filtering mechanism” that selects only a subset of pixels to create particles.
const randomThreshold = loadPercentage * resolution;
// Example: loadPercentage = 0.0007, resolution = 5
// randomThreshold = 0.0035
// Meaning each pixel has a 0.35% chance of being selected

// p5.random(1.0) generates a random number in [0, 1)
// A particle is created only when the random number <= randomThreshold
if (p5.random(1.0) > randomThreshold) continue;
This filtering process is like a lottery:
- Each pixel gets one “lottery draw”
randomThresholdis the winning probability, e.g., 0.0035 means a 0.35% chance of winning- If the pixel “wins,” a particle is created for it
- If it doesn’t win, the pixel is skipped
A concrete example: if loadPercentage is 0.0007 and resolution is 5, the final winning rate is 0.0035 (i.e., 0.35%). For a 1000x1000 image, approximately 3,500 particles would be created — enough to maintain visual quality without crashing the browser.
This sampling strategy ensures:
- Density control: Control total particle count by adjusting the threshold
- Random distribution: Avoid regular grid patterns, making particle distribution look more natural
- Performance balance: Reduce unnecessary particle creation, maintaining smooth animations
Geometric Principles of Coordinate Transformation
Coordinate transformation is the key step for centering images on the canvas. We need to convert image coordinates to canvas coordinates — like placing a photo on a larger board and calculating where to place it to center it.
// Convert image coordinates to canvas center coordinates
newParticle.target.x = x + p5.width / 2 - sourceImg.width / 2;
newParticle.target.y = y + p5.height / 2 - sourceImg.height / 2;

// Breaking it down:
// x: pixel x coordinate within the image (0 to sourceImg.width-1)
// p5.width / 2: canvas center x coordinate
// sourceImg.width / 2: image center offset
// Result: aligns the image center to the canvas center
Let’s understand this calculation with a concrete example:
- Assume canvas width is 800px, image width is 200px
- A pixel in the image has x coordinate 50
- Canvas center point is 400 (800/2)
- Image center offset is 100 (200/2)
- Final particle target position = 50 + 400 - 100 = 350
The result of this calculation is that the image is positioned relative to the canvas center, perfectly centering it regardless of image size.
Optimization Value of Transparency Filtering
Transparency filtering is a simple but very effective optimization strategy. Just like when scanning photos, we skip completely blank or transparent areas.
if (pixelA < 128) continue; // Semi-transparency threshold checkThe logic here is straightforward:
pixelAis the pixel’s transparency value, ranging from 0-255- 0 means completely transparent (invisible), 255 means completely opaque (fully visible)
- 128 is the midpoint, which we use as the “meaningful” threshold
By skipping transparent areas, we avoid creating particles for “invisible” regions.
Particle Lifecycle Management
// Step 12: Clean up unassigned particles
const preLen = preParticleIndexes.length;
if (preLen > 0) {
  for (let i = 0; i < preLen; i++) {
    const index = preParticleIndexes[i];
    allParticles[index].kill(); // Trigger particle fade-out animation
    allParticles[index].endColor = p5.color(0); // Become transparent
  }
}
This cleanup step ensures:
- Smooth transitions: Particles don’t disappear suddenly but fade out gradually
- Memory optimization: Prevent invalid particles from consuming computational resources
- Visual continuity: Maintain smooth visual effects during switching
Particle Class: Core Implementation and p5 Function Reference
The Particle class is the core of this system, implementing complex physics simulation and visual effects. Here’s the complete code:
export class Particle {
  p5: P5CanvasInstance<MySketchProps>;

  // Physics properties
  pos: P5.Vector; // Current position
  vel: P5.Vector; // Velocity vector
  acc: P5.Vector; // Acceleration vector
  target: P5.Vector; // Target position
  distToTarget: number = 0;

  // Visual properties
  currentColor: P5.Color; // Current color
  endColor: P5.Color; // Target color
  currentSize: number; // Current size

  // Lifecycle state
  isKilled: boolean = false;

  config: ParticleConfig;

  noiseOffsetX: number; // Random noise offset X
  noiseOffsetY: number; // Random noise offset Y

  // Reusable vectors for optimization
  private tempVec1: P5.Vector;
  private tempVec2: P5.Vector;
  private tempVec3: P5.Vector;

  constructor(
    x: number,
    y: number,
    p5: P5CanvasInstance<MySketchProps>,
    isMobile?: boolean,
    config?: ParticleConfig
  ) {
    this.p5 = p5;
    this.config =
      config ??
      {
        /* default config */
      };

    // Initialize physics properties
    this.pos = new P5.Vector(x, y);
    this.vel = new P5.Vector(0, 0);
    this.acc = new P5.Vector(0, 0);
    this.target = new P5.Vector(0, 0);

    // Randomize properties for a natural feel
    this.maxSpeed = p5.random(maxSpeedRange[0], maxSpeedRange[1]);
    this.maxForce = p5.random(maxForceRange[0], maxForceRange[1]);
    this.colorBlendRate = p5.random(
      colorBlendRateRange[0],
      colorBlendRateRange[1]
    );

    this.noiseOffsetX = p5.random(1000);
    this.noiseOffsetY = p5.random(1000);

    // Initialize reusable vectors (avoid frequent memory allocation)
    this.tempVec1 = new P5.Vector();
    this.tempVec2 = new P5.Vector();
    this.tempVec3 = new P5.Vector();
  }
  /**
   * Particle motion logic - integrates seeking, noise perturbation, mouse interaction and more
   * This method is called every frame, responsible for updating position, velocity, and acceleration
   */
  public move() {
    const p5 = this.p5;
    const { closeEnoughTarget, speed, scaleRatio, mouseSize } = this.config;

    // 1. Add Perlin noise perturbation for more natural movement
    const noiseScale = this.config.noiseScale ?? 0.005;
    const noiseStrength = this.config.noiseStrength ?? 0.6;
    this.tempVec1.set(
      p5.noise(
        this.noiseOffsetX + this.pos.x * noiseScale,
        this.pos.y * noiseScale
      ) *
        noiseStrength -
        noiseStrength / 2,
      p5.noise(
        this.noiseOffsetY + this.pos.y * noiseScale,
        this.pos.x * noiseScale
      ) *
        noiseStrength -
        noiseStrength / 2
    );
    this.acc.add(this.tempVec1);

    // 2. Calculate distance to target (core of seeking behavior)
    const dx = this.target.x - this.pos.x;
    const dy = this.target.y - this.pos.y;
    const distSq = dx * dx + dy * dy;
    this.distToTarget = Math.sqrt(distSq);

    // 3. Proximity deceleration mechanism - prevent oscillation at target
    let proximityMult = 1;
    if (this.distToTarget < closeEnoughTarget) {
      proximityMult = this.distToTarget / closeEnoughTarget;
      this.vel.mult(0.9); // Strong damping, fast stabilization
    } else {
      this.vel.mult(0.95); // Light damping, maintain fluid motion
    }

    // 4. Seeking force toward target
    if (distSq > 1) {
      this.tempVec2.set(this.target.x - this.pos.x, this.target.y - this.pos.y);
      this.tempVec2.normalize();
      this.tempVec2.mult(this.maxSpeed * proximityMult * speed);
      this.acc.add(this.tempVec2);
    }

    // 5. Mouse interaction system
    const scaledMouseX = p5.mouseX / scaleRatio; // Scaling because image is scaled
    const scaledMouseY = p5.mouseY / scaleRatio;
    const mouseDx = scaledMouseX - this.pos.x;
    const mouseDy = scaledMouseY - this.pos.y;
    const mouseDistSq = mouseDx * mouseDx + mouseDy * mouseDy;

    if (mouseDistSq < mouseSize * mouseSize) {
      const mouseDist = Math.sqrt(mouseDistSq);

      if (p5.mouseIsPressed) {
        // Mouse pressed: attract particles
        this.tempVec3.set(mouseDx, mouseDy);
      } else {
        // Mouse hover: repel particles
        this.tempVec3.set(-mouseDx, -mouseDy);
      }
      this.tempVec3.normalize();
      this.tempVec3.mult((mouseSize - mouseDist) * 0.05);
      this.acc.add(this.tempVec3);
    }

    // 6. Apply physics update: acceleration -> velocity -> position
    this.vel.add(this.acc);
    this.vel.limit(this.maxForce * speed);
    this.pos.add(this.vel);
    this.acc.mult(0); // Reset acceleration for next frame

    // 7. Update noise offset for continuity
    this.noiseOffsetX += 0.01;
    this.noiseOffsetY += 0.01;
  }

  /**
   * Particle rendering logic - handles color transitions, size changes, and final drawing
   * This method handles the visual representation, including color interpolation and size mapping
   */
  public draw() {
    const p5 = this.p5;
    const { closeEnoughTarget, particleSize } = this.config;

    // 1. Smooth color transition - using linear interpolation for natural color changes
    this.currentColor = p5.lerpColor(
      this.currentColor,
      this.endColor,
      this.colorBlendRate
    );
    p5.stroke(this.currentColor);

    // 2. Dynamic size calculation based on distance
    let targetSize = 2; // Default minimum size
    if (!this.isKilled) {
      // Closer to target = larger particle, creating an "arrival" feel
      targetSize = p5.map(
        p5.min(this.distToTarget, closeEnoughTarget),
        closeEnoughTarget,
        0,
        0,
        particleSize
      );
    }

    // 3. Smooth size transition - avoid abrupt changes, maintain visual continuity
    this.currentSize = p5.lerp(this.currentSize, targetSize, 0.1);

    // 4. Set drawing attributes and render particle
    p5.strokeWeight(this.currentSize);
    p5.point(this.pos.x, this.pos.y); // Draw particle as a point
  }
  // Boundary detection - particles outside the screen are marked as dead
  public isOutOfBounds(): boolean {
    const margin = 50;
    return (
      this.pos.x < -margin ||
      this.pos.x > this.p5.width + margin ||
      this.pos.y < -margin ||
      this.pos.y > this.p5.height + margin
    );
  }

  // Particle recycling cleanup
  public kill(): void {}
}
p5.js Function Reference
Before diving into the step-by-step explanation, let’s briefly understand a few key p5.js functions:
p5.lerpColor() - Color Linear Interpolation
Color interpolation is like mixing paints on a palette. Imagine you want to gradually change from red to blue — lerpColor can calculate all the transition colors in between.
// Syntax: lerpColor(c1, c2, amt)
// Linearly interpolate between two colors
// amt: value between 0-1, 0 returns c1, 1 returns c2
this.currentColor = p5.lerpColor(
  this.currentColor,
  this.endColor,
  this.colorBlendRate
);
For example, from red to blue:
amt = 0: Completely redamt = 0.5: Purple (red-blue mix)amt = 1: Completely blue
p5.noise() - Perlin Noise Generation
Perlin noise can be thought of as nature’s randomness — like cloud shapes or water ripple textures. It’s not completely random but rather a “naturally random” pattern with some regularity.
// Syntax: noise(x, [y], [z])
// Generate continuous pseudo-random noise values
const noiseValue = p5.noise(
  this.noiseOffsetX + this.pos.x * noiseScale,
  this.pos.y * noiseScale
);
This makes particle motion look more like natural phenomena rather than rigid mechanical movement.
p5.map() - Value Mapping
The map function is like a scale converter. For example, converting Celsius to Fahrenheit, or mapping a 0-100 score to A-F grades.
// Syntax: map(value, start1, stop1, start2, stop2)
// Map a value from one range to another
targetSize = p5.map(
  p5.min(this.distToTarget, closeEnoughTarget),
  closeEnoughTarget,
  0,
  0,
  particleSize
);
Example: The code above converts distance to particle size:
- Far from the target: small particle
- Close to the target: large particle
mapautomatically calculates the proportions in between
P5.Vector - Vector Operations
// Create a vector
const vel = new P5.Vector(x, y);

// Vector operations
vel.normalize(); // Normalize: keep direction, set length to 1
vel.mult(magnitude); // Scale: change length, keep direction
vel.add(otherVector); // Add: compose two forces
vel.limit(maxMag); // Limit magnitude: prevent velocity from getting too fast
Just like force composition in physics: if a particle is simultaneously subjected to a rightward force and an upward force, the final direction of motion is the composition of these two forces.
Now let’s proceed with the step-by-step explanation.
Particle Motion Logic: move
The particle motion system combines multiple physics simulation techniques:
Seeking Behavior
/**
 * Particle motion logic - integrates seeking, noise perturbation, mouse interaction and more
 * Called every frame, responsible for updating position, velocity, and acceleration
 */
public move() {
  const p5 = this.p5;
  const { closeEnoughTarget, speed, scaleRatio, mouseSize } = this.config;

  // 1. Add Perlin noise perturbation for more natural movement
  const noiseScale = this.config.noiseScale ?? 0.005;
  const noiseStrength = this.config.noiseStrength ?? 0.6;
  this.tempVec1.set(
    p5.noise(
      this.noiseOffsetX + this.pos.x * noiseScale,
      this.pos.y * noiseScale
    ) *
      noiseStrength -
      noiseStrength / 2,
    p5.noise(
      this.noiseOffsetY + this.pos.y * noiseScale,
      this.pos.x * noiseScale
    ) *
      noiseStrength -
      noiseStrength / 2
  );
  this.acc.add(this.tempVec1);

  // 2. Calculate distance to target (core of seeking behavior)
  const dx = this.target.x - this.pos.x;
  const dy = this.target.y - this.pos.y;
  const distSq = dx * dx + dy * dy;
  this.distToTarget = Math.sqrt(distSq);

  // 3. Proximity deceleration - prevent oscillation at target
  let proximityMult = 1;
  if (this.distToTarget < closeEnoughTarget) {
    proximityMult = this.distToTarget / closeEnoughTarget;
    this.vel.mult(0.9); // Strong damping, fast stabilization
  } else {
    this.vel.mult(0.95); // Light damping, maintain fluid motion
  }

  // 4. Seeking force toward target
  if (distSq > 1) {
    this.tempVec2.set(this.target.x - this.pos.x, this.target.y - this.pos.y);
    this.tempVec2.normalize();
    this.tempVec2.mult(this.maxSpeed * proximityMult * speed);
    this.acc.add(this.tempVec2);
  }

  // 5. Mouse interaction system
  const scaledMouseX = p5.mouseX / scaleRatio; // Scaling because image is scaled
  const scaledMouseY = p5.mouseY / scaleRatio;
  const mouseDx = scaledMouseX - this.pos.x;
  const mouseDy = scaledMouseY - this.pos.y;
  const mouseDistSq = mouseDx * mouseDx + mouseDy * mouseDy;

  if (mouseDistSq < mouseSize * mouseSize) {
    const mouseDist = Math.sqrt(mouseDistSq);

    if (p5.mouseIsPressed) {
      // Mouse pressed: attract particles
      this.tempVec3.set(mouseDx, mouseDy);
    } else {
      // Mouse hover: repel particles
      this.tempVec3.set(-mouseDx, -mouseDy);
    }
    this.tempVec3.normalize();
    this.tempVec3.mult((mouseSize - mouseDist) * 0.05);
    this.acc.add(this.tempVec3);
  }

  // 6. Apply physics update: acceleration -> velocity -> position
  this.vel.add(this.acc);
  this.vel.limit(this.maxForce * speed);
  this.pos.add(this.vel);
  this.acc.mult(0); // Reset acceleration for next frame

  // 7. Update noise offset for continuity
  this.noiseOffsetX += 0.01;
  this.noiseOffsetY += 0.01;
}- Perlin Noise Perturbation Force in Detail:
Perlin noise is one of the most important algorithms in computer graphics, invented by Ken Perlin in 1983, specifically designed to generate natural-feeling random textures and motion. In our particle system, its role is to make particle movement paths more natural, avoiding overly mechanical straight-line motion.
// 1. The role of noise offsets
this.noiseOffsetX = p5.random(1000); // Generate unique noise starting point for each particle
this.noiseOffsetY = p5.random(1000);

// 2. 2D Perlin noise generates natural random forces
const noiseForceX =
  p5.noise(this.noiseOffsetX + this.pos.x * 0.005, this.pos.y * 0.005) * 0.6 -
  0.3;
const noiseForceY =
  p5.noise(this.noiseOffsetY + this.pos.y * 0.005, this.pos.x * 0.005) * 0.6 -
  0.3;

// 3. Updating noise offset (simulating time passing)
this.noiseOffsetX += 0.01;
this.noiseOffsetY += 0.01;
Why Do We Need Noise Offsets?
Imagine if all particles used the same noise function:
// Bad approach: all particles use identical noise
const force = p5.noise(this.pos.x * 0.005, this.pos.y * 0.005);
This would cause all particles at the same coordinates to experience exactly the same force, producing “synchronized” motion that looks very unnatural.
By assigning different noiseOffset values to each particle, we’re essentially “assigning” different starting positions in noise space for each particle:
// Good approach: each particle has a unique noise offset
// Particle A: offset = 123.45
const forceA = p5.noise(123.45 + this.pos.x * 0.005, this.pos.y * 0.005);
// Particle B: offset = 987.65
const forceB = p5.noise(987.65 + this.pos.x * 0.005, this.pos.y * 0.005);
Noise Parameter Details:
noiseScale = 0.005(Noise Scale Factor)- Controls the “roughness” or “frequency” of the noise
- Smaller values = smoother noise changes, gentler particle motion
- Larger values = more dramatic noise changes, more random particle motion
// Smooth motion (large-scale noise)
const smoothForce = p5.noise(x * 0.001, y * 0.001);

// Chaotic motion (small-scale noise)
const chaoticForce = p5.noise(x * 0.02, y * 0.02);-
noiseStrength = 0.6(Noise Strength)- Controls the maximum amplitude of noise force
- Through
* 0.6 - 0.3, maps [0,1] to [-0.3, 0.3] - This allows particles to be forced in any direction
-
Time Dimension of Noise
- By incrementing
noiseOffset += 0.01each frame, we simulate the passage of time - This causes the noise field to slowly change over time, producing a “wind field” effect
- By incrementing
Visual Effect Comparison of Noise:
// Without noise: particles move directly to target, path is rigid
const force = target.sub(position).normalize().mult(speed);

// With noise: particles are influenced by "wind" while moving to target, path is natural
const seekForce = target.sub(position).normalize().mult(speed);
const noiseForce = calculatePerlinNoise(position, time);
const totalForce = seekForce.add(noiseForce);- Noise value range [0,1], converted to bidirectional force [-0.3, 0.3] through
* 0.6 - 0.3 - Using position coordinates as noise input ensures neighboring particles have similar but not identical forces
- Noise offsets create unique “wind field” experiences for each particle, avoiding synchronized motion
- Physical Meaning of Damping Coefficients:
vel.mult(0.9): Strong damping, simulating motion in a viscous mediumvel.mult(0.95): Light damping, simulating air resistance- Damping prevents particle oscillation, ensuring stable convergence to the target position
- Principle of Force Superposition:
F_total = F_seek + F_noise + F_mouse
this.acc.add(seekForce); // Seeking force
this.acc.add(noiseForce); // Noise perturbation force
this.acc.add(mouseForce); // Mouse interaction force
Mouse Interaction System
// Mouse interaction logic
const scaledMouseX = p5.mouseX / scaleRatio;
const scaledMouseY = p5.mouseY / scaleRatio;

// Using squared distance comparison (avoiding square root)
const mouseDx = scaledMouseX - this.pos.x;
const mouseDy = scaledMouseY - this.pos.y;
const mouseDistSq = mouseDx * mouseDx + mouseDy * mouseDy;
const mouseSizeSq = mouseSize * mouseSize;

if (mouseDistSq < mouseSizeSq) {
  const mouseDist = Math.sqrt(mouseDistSq); // Only compute square root when needed

  if (p5.mouseIsPressed) {
    // Mouse pressed: attract particles
    this.tempVec3.set(mouseDx, mouseDy);
  } else {
    // Mouse hover: repel particles
    this.tempVec3.set(-mouseDx, -mouseDy);
  }

  this.tempVec3.normalize();
  this.tempVec3.mult((mouseSize - mouseDist) * 0.05);
  this.acc.add(this.tempVec3);
}

// Apply physics update
this.vel.add(this.acc);
this.vel.limit(this.maxForce * speed);
this.pos.add(this.vel);
this.acc.mult(0); // Reset acceleration
Particle Rendering: draw
public draw() {
  const p5 = this.p5;
  const { closeEnoughTarget, particleSize } = this.config;

  // Smooth color transition
  this.currentColor = p5.lerpColor(
    this.currentColor,
    this.endColor,
    this.colorBlendRate
  );

  p5.stroke(this.currentColor);

  // Distance-based size calculation
  let targetSize = 2;
  if (!this.isKilled) {
    targetSize = p5.map(
      p5.min(this.distToTarget, closeEnoughTarget),
      closeEnoughTarget,
      0,
      0,
      particleSize
    );
  }

  // Smooth size transition
  this.currentSize = p5.lerp(this.currentSize, targetSize, 0.1);
  p5.strokeWeight(this.currentSize);
  p5.point(this.pos.x, this.pos.y);
}
Main Render Loop: p5.draw Implementation
p5.js draws each frame in the draw function, which is called repeatedly — similar to requestAnimationFrame (typically at 60 FPS) — to update all particle states and render them.
/**
 * Main render loop - core function executed once per frame
 * Responsible for particle updates, rendering, and memory management
 */
p5.draw = () => {
  // 1. Early return optimization - avoid unnecessary computation
  if (!(activeAnim && allParticles?.length)) {
    return; // Return immediately if animation is inactive or no particles
  }

  // 2. Clear previous frame's canvas content
  p5.clear();

  // 3. Two-pointer algorithm for active particle compaction
  let writeIndex = 0; // Write pointer: next position for an active particle

  // 4. Iterate all particles, updating and managing lifecycle simultaneously
  for (let readIndex = 0; readIndex < allParticles.length; readIndex++) {
    const particle = allParticles[readIndex];

    // 5. Execute particle physics update and rendering
    particle.move(); // Update position, velocity, acceleration
    particle.draw(); // Render to canvas

    // 6. Lifecycle check and array compaction
    if (!(particle.isKilled || particle.isOutOfBounds())) {
      // Particle is still active, needs to be kept
      if (writeIndex !== readIndex) {
        // Only assign when positions differ (avoid self-assignment)
        allParticles[writeIndex] = allParticles[readIndex];
      }
      writeIndex++; // Advance write pointer
    }
    // Note: dead particles are automatically skipped, not copied to new positions
  }

  // 7. Truncate array - remove dead particle references at the end
  allParticles.length = writeIndex;
};
The reason for switching to a two-pointer approach is that the original dead particle cleanup was very inefficient:
- When there are no dead particles at the front of the array,
writeIndex === readIndex - In this case, the assignment
a[i] = a[i]is redundant and can be skipped - In particle-dense scenarios, this optimization eliminates many unnecessary operations
// Original code: each deletion requires moving many elements
for (let i = allParticles.length - 1; i >= 0; i--) {
  if (allParticles[i].isKilled) {
    allParticles.splice(i, 1);
  }
}

// Two-pointer: single traversal completes deletion, O(n) complexity
let writeIndex = 0;
for (let readIndex = 0; readIndex < allParticles.length; readIndex++) {
  if (!allParticles[readIndex].isKilled) {
    allParticles[writeIndex++] = allParticles[readIndex];
  }
}
allParticles.length = writeIndex;
Using p5 in React
The original code implemented everything it needed to, but for integration into React, it’s obviously better to work within the React ecosystem. Here’s the record of migrating to React:
Technology Choice: @p5-wrapper/react
There are multiple approaches for integrating p5.js into React. I ultimately chose the @p5-wrapper/react library, mainly because it has everything needed:
- TypeScript support: Complete type definitions, great development experience
- React lifecycle integration: Automatically handles component mount/unmount
- Reactive props updates: Supports real-time sketch parameter updates via
updateWithProps
pnpm i @p5-wrapper/react p5
pnpm i -D @types/p5
Component Architecture Design
Core Component Structure
// Type definitions
export type MySketchProps = SketchProps & {
  activeAnim: boolean; // Animation toggle
  imageIdx: number; // Current image index
  id?: string; // DOM container ID
  particleConfig?: ParticleConfig; // Particle configuration
};

// Main component
export const DynamicParticleGL = ({
  activeAnim,
  imageIdx,
  id = "particle-container",
  getSourceImgInfos,
  particleConfig,
}: DynamicParticleGLProps) => {
  // Use useMemo to cache the sketch function, avoiding re-creation
  const wrappedSketch = useMemo(() => {
    return function sketch(p5: P5CanvasInstance<MySketchProps>) {
      // sketch implementation...
    };
  }, [getSourceImgInfos]);

  return (
    <ReactP5Wrapper
      sketch={wrappedSketch}
      activeAnim={activeAnim}
      imageIdx={imageIdx}
      id={id}
      particleConfig={particleConfig}
    />
  );
};
React-ifying the Sketch Function
Native p5.js approach:
function sketch(p5) {
  p5.setup = () => {
    /* ... */
  };
  p5.draw = () => {
    /* ... */
  };
}
After React wrapping:
function sketch(p5: P5CanvasInstance<MySketchProps>) {
  // State variables
  let activeAnim = false;
  let canvas: P5.Renderer;
  const allParticles: Array<Particle> = [];

  // Respond to React props changes
  p5.updateWithProps = (props) => {
    activeAnim = props.activeAnim ?? false;
    setImageIdx(props?.imageIdx || 0);

    // Dynamic config updates
    if (props.particleConfig) {
      Object.assign(currentParticleConfig, props.particleConfig);
    }

    // Dynamic DOM container binding
    if (canvas && props.id) {
      canvas.parent(props.id);
    }
  };

  p5.preload = () => {
    /* Image preloading */
  };
  p5.setup = () => {
    /* Initialization setup */
  };
  p5.draw = () => {
    /* Render loop */
  };
}
Props-Driven State Updates
// In the demo component
const [active, setActive] = useState(true);
const [imageIdx, setImageIdx] = useState(0);

// Real-time config updates (using Leva control panel)
const particleControls = useControls("Particle System", {
  particleSize: { value: isMobile ? 4 : 5, min: 1, max: 20, step: 1 },
  speed: { value: 3, min: 0.1, max: 10, step: 0.1 },
  // ... more config options
});

// Config transformation
const particleConfig = {
  closeEnoughTarget: particleControls.closeEnoughTarget,
  speed: particleControls.speed,
  maxSpeedRange: [
    particleControls.maxSpeedMin,
    particleControls.maxSpeedMax,
  ] as [number, number],
  // ... other config mappings
};
Caching the Sketch Function with useMemo
// Avoid recreating the sketch function on every render
const wrappedSketch = useMemo(() => {
  return function sketch(p5: P5CanvasInstance<MySketchProps>) {
    // sketch implementation
  };
}, [getSourceImgInfos]); // Only recreate when image source config changes
TypeScript Type Safety
Complete Type Definitions
// Particle config type
export type ParticleConfig = {
  closeEnoughTarget: number;
  speed: number;
  mouseSize: number;
  scaleRatio: number;
  particleSize: number;
  maxSpeedRange?: [number, number];
  maxForceRange?: [number, number];
  colorBlendRate?: [number, number];
  noiseScale?: number;
  noiseStrength?: number;
};

// Image source config type
type SourceImageInfo = {
  url: string;
  scaleNum?: number;
  resize?: [number, number];
  loadPercentage?: number;
  resolution?: number;
};

// Component props type
interface DynamicParticleGLProps {
  activeAnim?: boolean;
  imageIdx: number;
  id?: string;
  getSourceImgInfos?: (isMobile: boolean) => SourceImageInfo[];
  particleConfig?: ParticleConfig;
}
P5 Instance Type Extension
// Extend P5 instance type to support custom props
export type MySketchProps = SketchProps & {
  activeAnim: boolean;
  imageIdx: number;
  id?: string;
  particleConfig?: ParticleConfig;
};

// Use strong typing in the sketch function
function sketch(p5: P5CanvasInstance<MySketchProps>) {
  p5.updateWithProps = (props: MySketchProps) => {
    // TypeScript provides full type hints and checking
    activeAnim = props.activeAnim ?? false;
    setImageIdx(props.imageIdx || 0);
  };
}
This integration approach preserves p5.js’s powerful graphics processing capabilities while fully leveraging React’s componentization and state management advantages, providing a reliable technical foundation for building complex interactive visualization applications.
Use Cases and Examples
While particle effect performance is still quite concerning and not recommended for performance-critical scenarios, it’s suitable for showcase-style web pages.
Possible use cases include:
- Dynamic display of corporate brand logos
- As backgrounds for logo carousels, etc.
- As backgrounds with an overlay mask
Refs
-
Particles to Image - Original OpenProcessing work
-
Understanding Perlin Noise - Adrian Biagioli’s detailed Perlin noise explanation with visual examples
-
p5.js noise() Function Documentation - Official p5.js noise function documentation
-
Perlin Noise Explained Visually - Visual explanation of the Perlin noise algorithm
-
Force-based Particle Systems - Autonomous Agents
-
@p5-wrapper/react Documentation - p5.js React wrapper
This article is being revised continuously. Feel free to leave a comment if you spot any errors.
喜欢的话,留下你的评论吧~